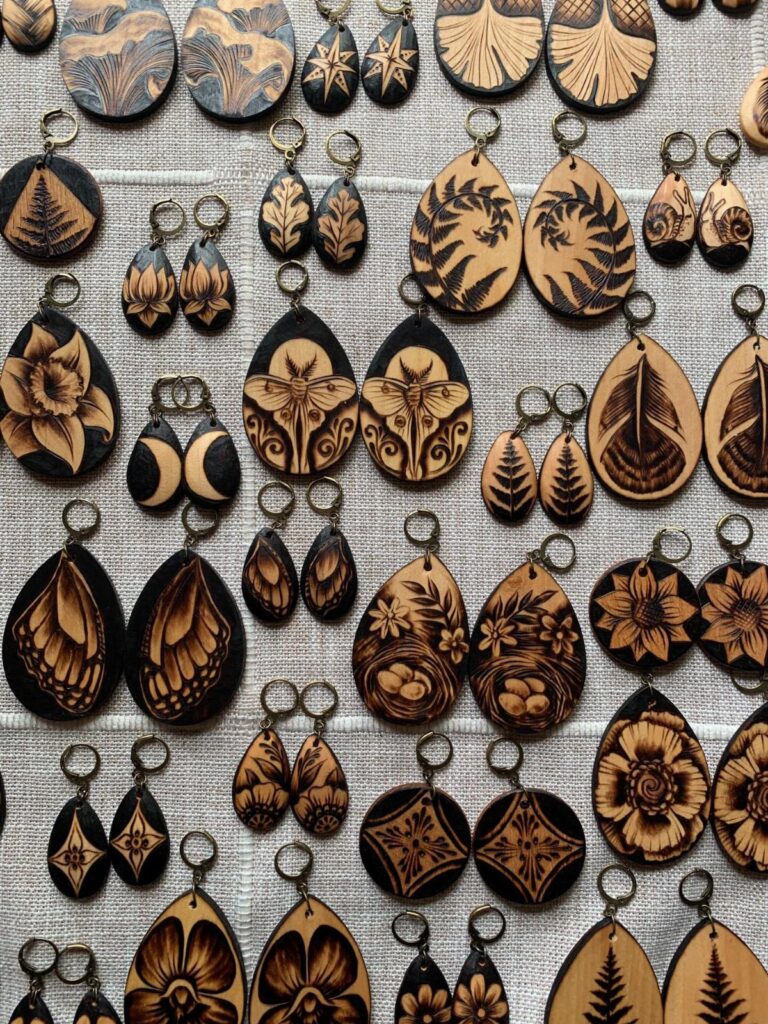
Surface size sets the effort on these projects: earrings, bookmarks and keychains hold one small image and finish in an afternoon, while a burned tabletop takes many sittings.
Pick by the space you’re willing to fill, and by how steady your hand is on fine detail, since a Celtic knot box or a portrait plaque rewards patience far more than speed.
The clock sits at the other end of that range, since Roman numerals are only a few straight strokes each, so a flat, simple shape can look impressive on day one.
1. Earrings
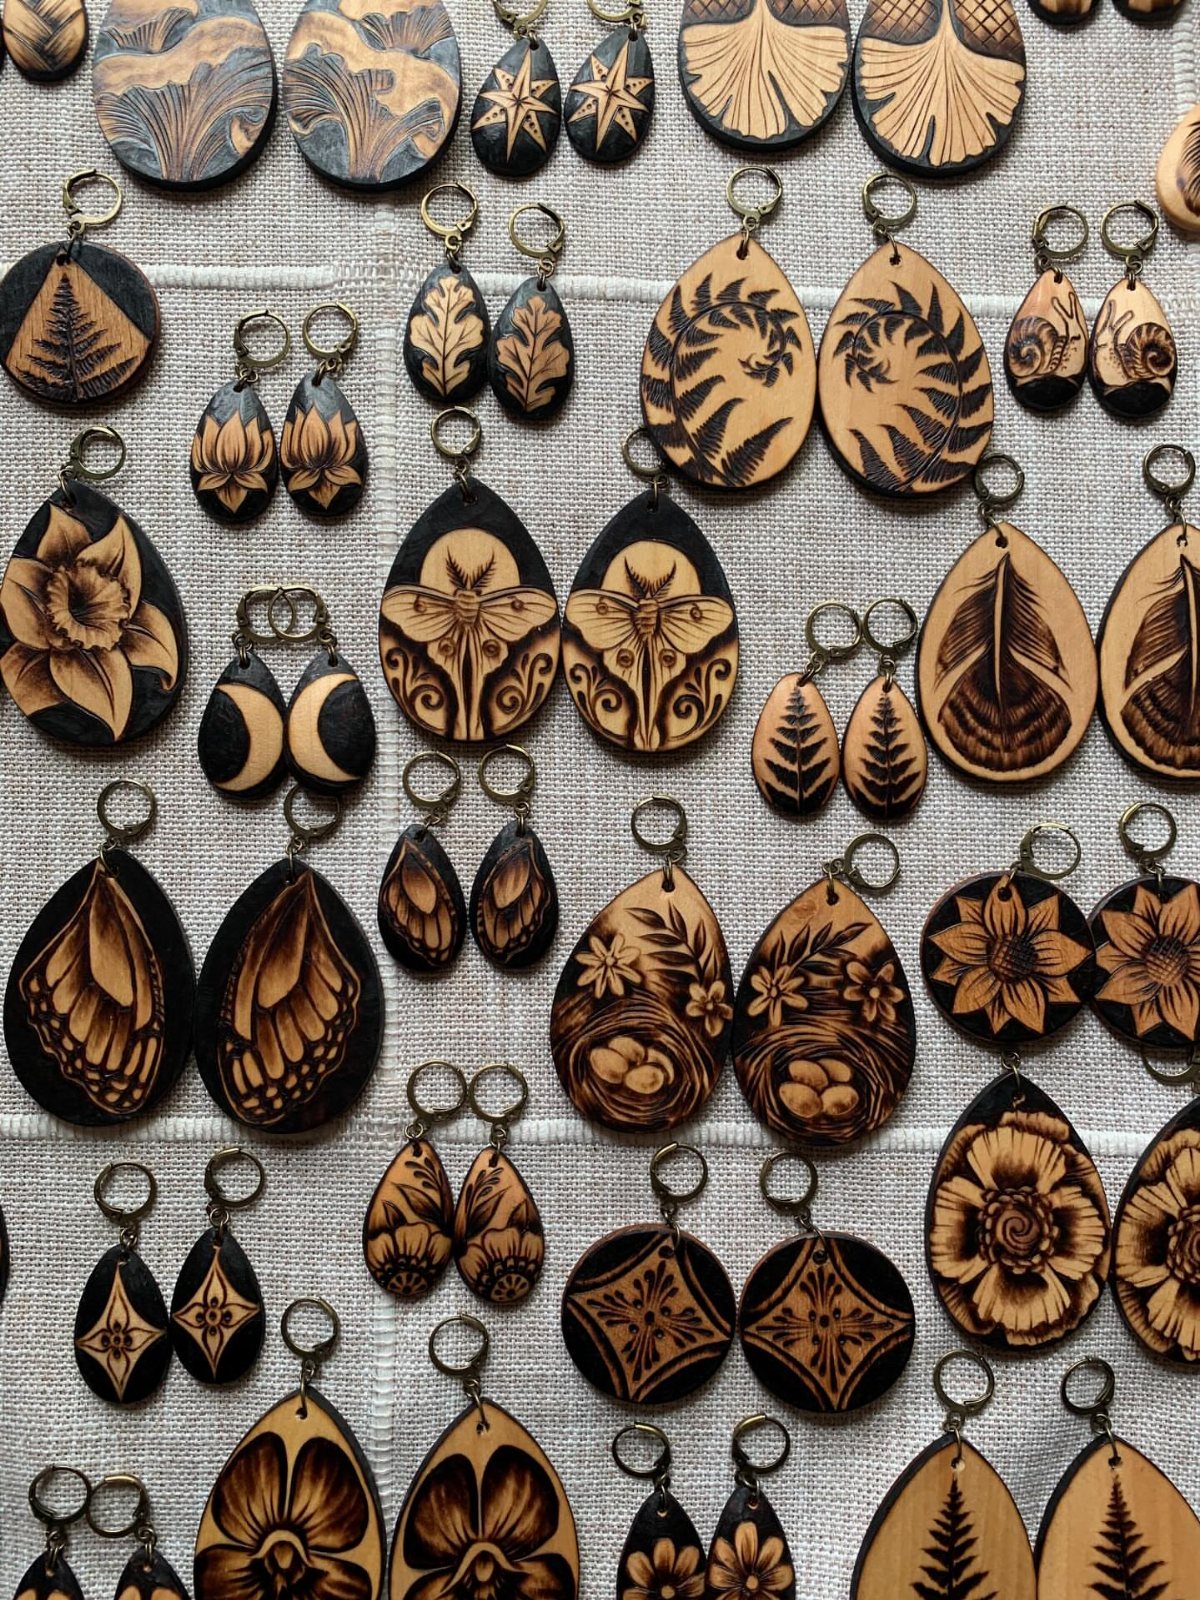
Wood earrings are the smallest canvas in wood burning, which is why they suit a short afternoon. Teardrop and round blanks give you a tiny surface, so a floral spray or a few leaves reads better than anything crowded.
Burn one earring, then match the second to it by eye. Perfect mirror images are hard, and a slight difference between the pair looks handmade rather than wrong.
Wood is light, which makes larger shapes comfortable to wear. Start with a round pair if you’re new to pyrography.
2. Coasters
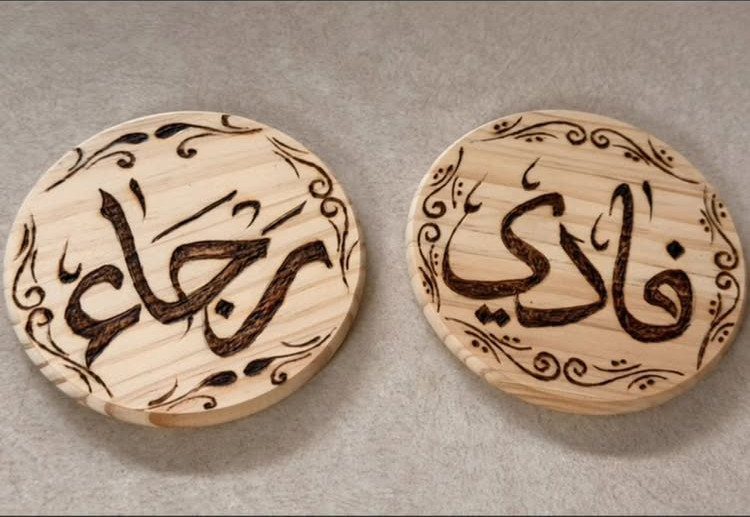
Coasters get used, handed over as gifts, and replaced, so a matching set makes a friendly project for a beginner.
A round blank gives the burn a built-in frame: I like a simple swirling border with lettering or a name in the middle.
Calligraphy needs a steady hand, so pencil the words first and burn over the lines slowly. Skip the border if the lettering is the star.
Personalizing them with a name or a short word is what turns a plain set into a gift people keep.
3. Celtic Knot Box
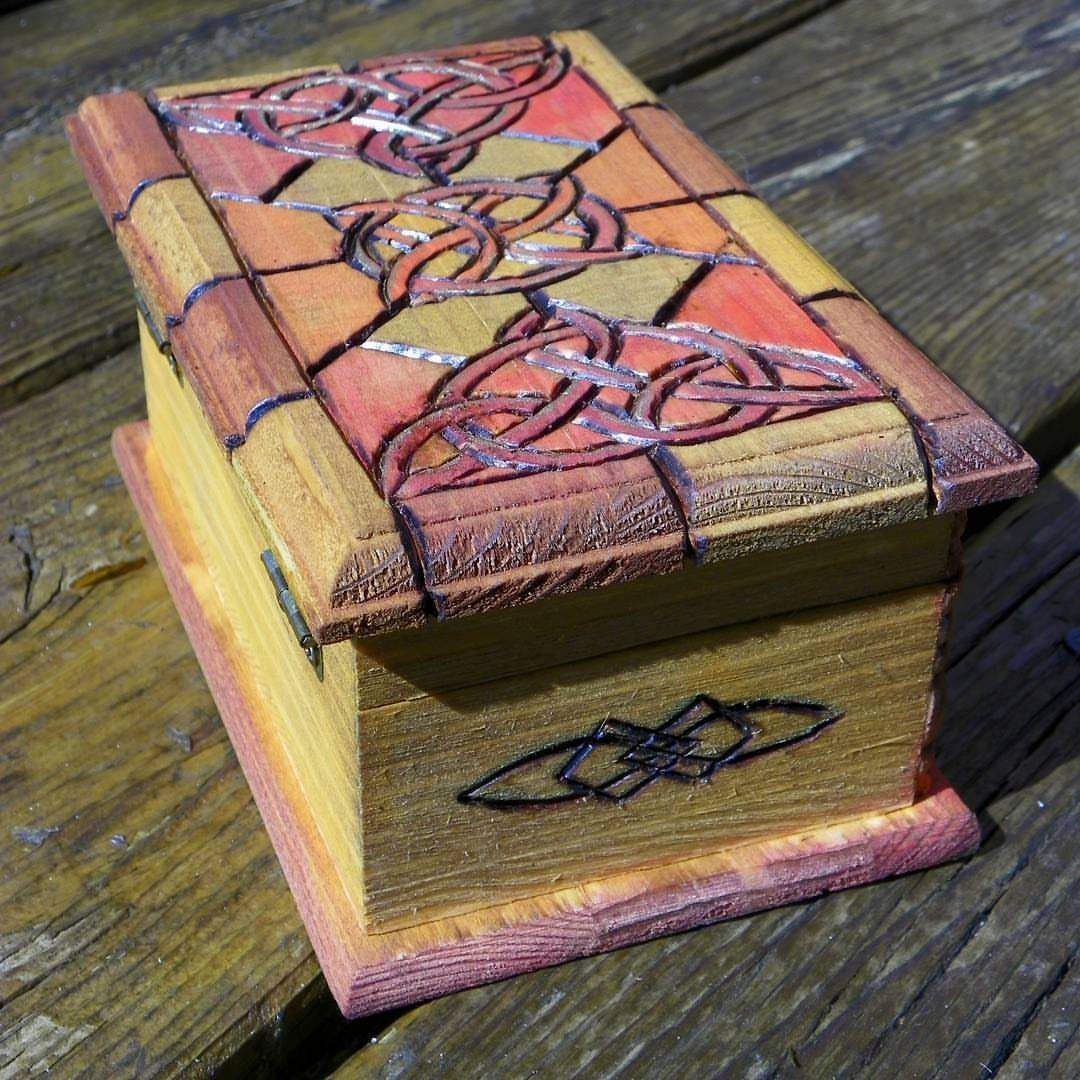
A small wooden box with Celtic knots on the lid and sides is the project to pick when you want something slower and more rewarding than a flat plaque.
Knots are continuous lines that pass over and under, so the work is patience more than skill.
Trace the pattern in pencil first, and burn the over-under gaps carefully so the crossings read clearly. Do the lid before the sides, since a flat surface is easier to practice on.
Expect more than one sitting. It’s worth it.
4. Personalized Cutting Board
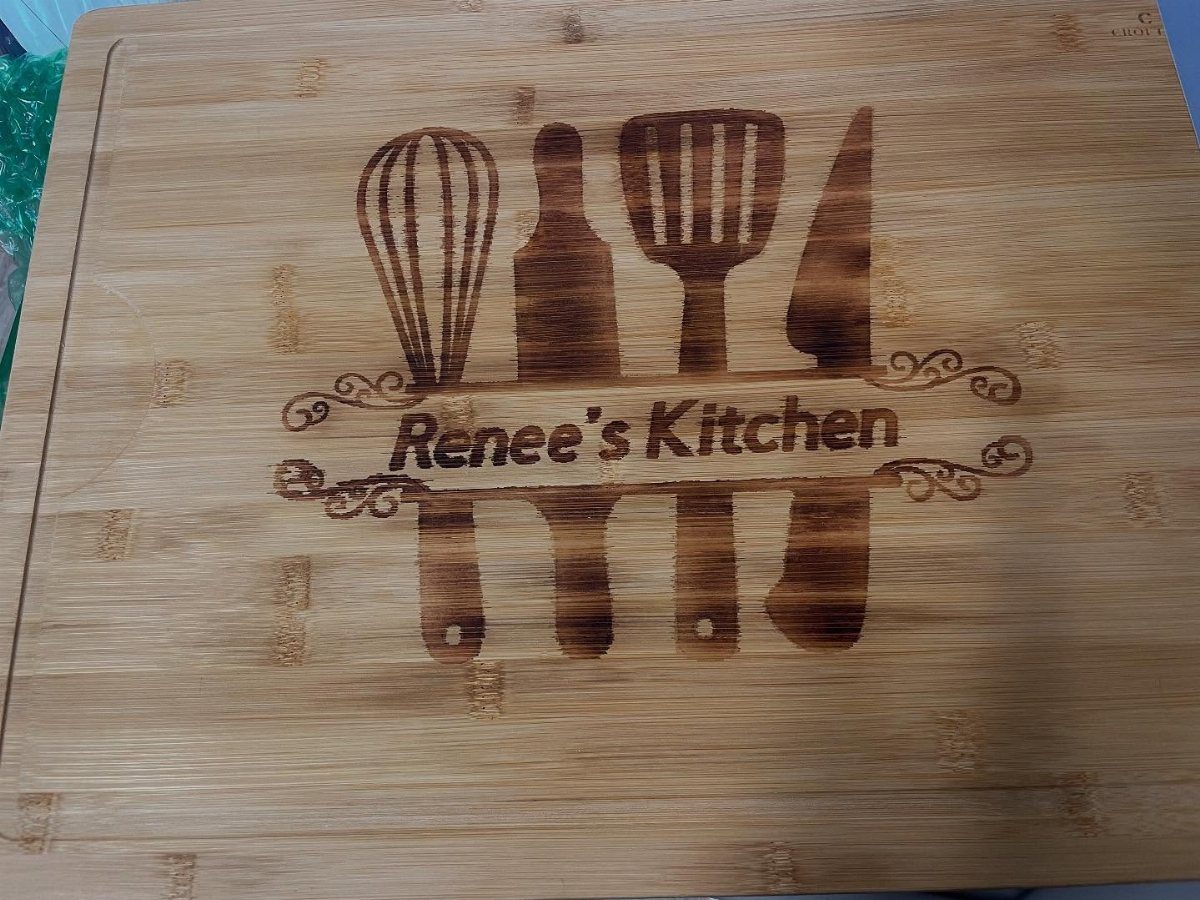
Few gifts say "this is your kitchen" like a cutting board with its owner’s name burned across the middle. A ring of utensils around a name, whisk and spatula and knife, fills the space well without needing fine detail.
Sketch the layout in pencil and center the lettering before you heat the tool. Bold outlines are more forgiving than shading, and they keep the design easy to read.
Burn only the design area, and keep a spare scrap board for practice runs.
5. Decorative Spoon
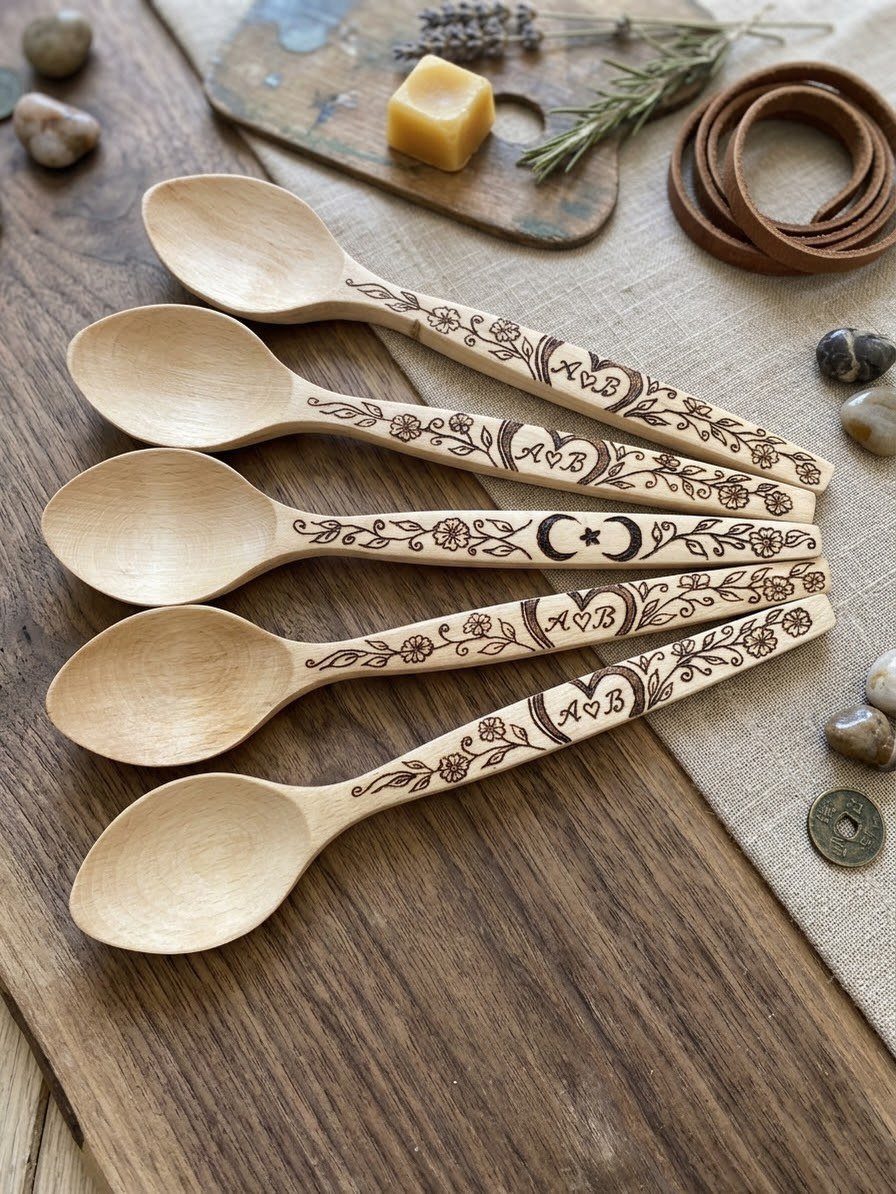
A wooden spoon is cheap, curved, and already has a handle to decorate, which makes it a good first burn for a small budget. Handles take initials, a crescent moon, or a thin floral vine well.
Keep the design on the flat handle and away from the bowl. Curves are tricky, so I’d practice a line or two on the back first.
Make a batch of five and give them out. Matching initials such as "A+B" make a sweet wedding or housewarming gift.
6. Bookmark
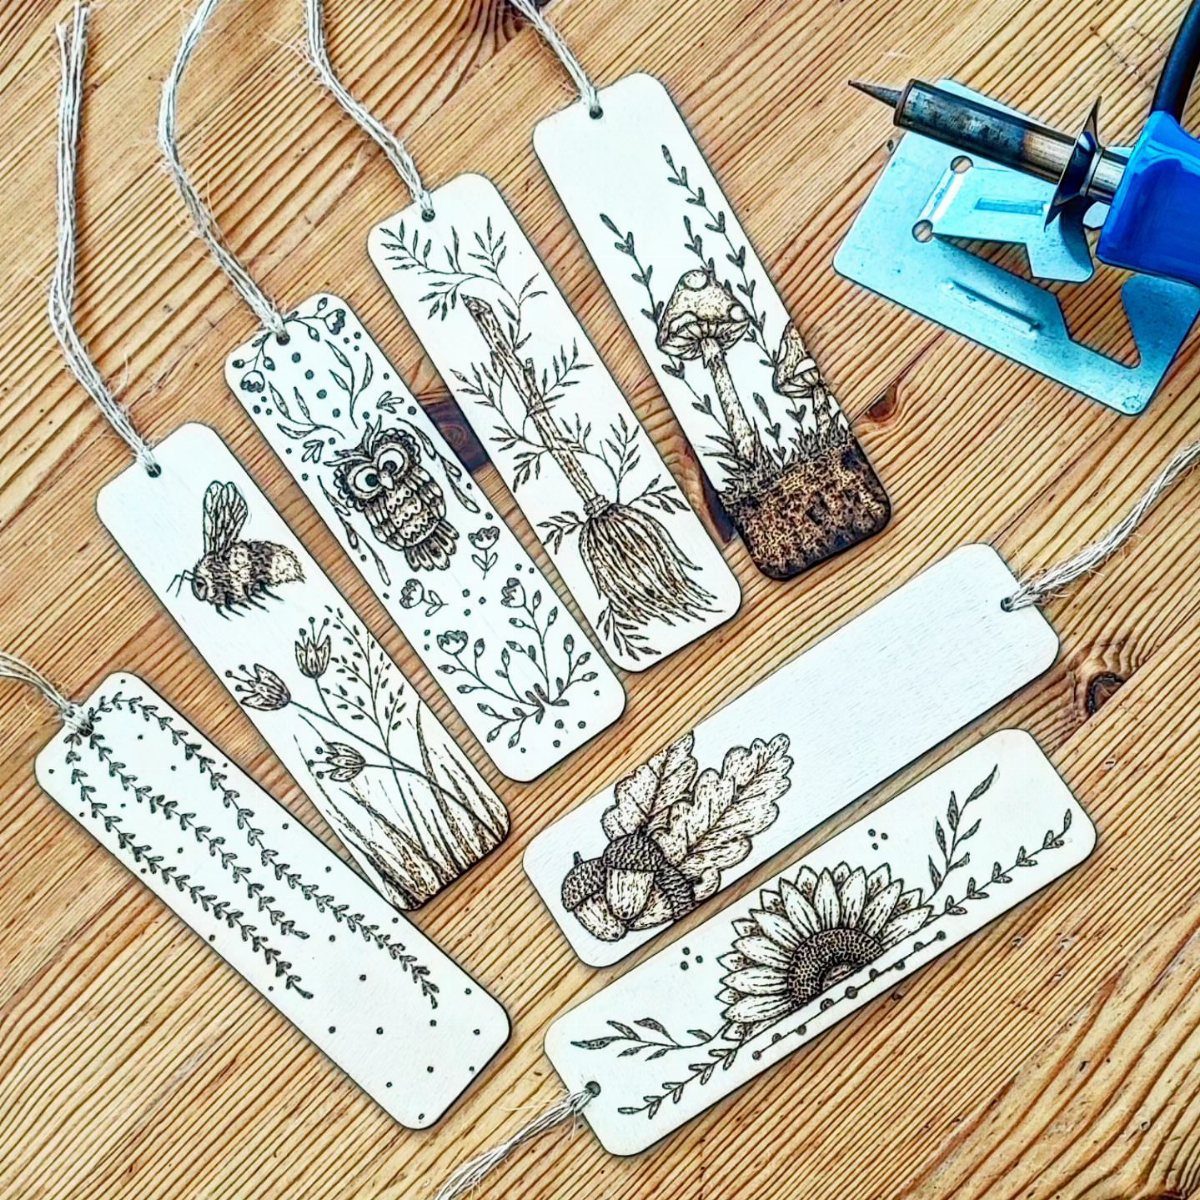
Bookmarks are narrow, so one small illustration is all they can hold, and that limit is what makes them easy to finish. An owl or a few mushrooms fits the shape without crowding.
Draw the picture in pencil, then burn the outline first and add shading last. Fine detail needs a pointed tip and slow hands.
You can burn a whole set in an afternoon, and each one costs little. Pick a theme, like nature, and every bookmark in the batch looks like it belongs.
7. Growth Chart
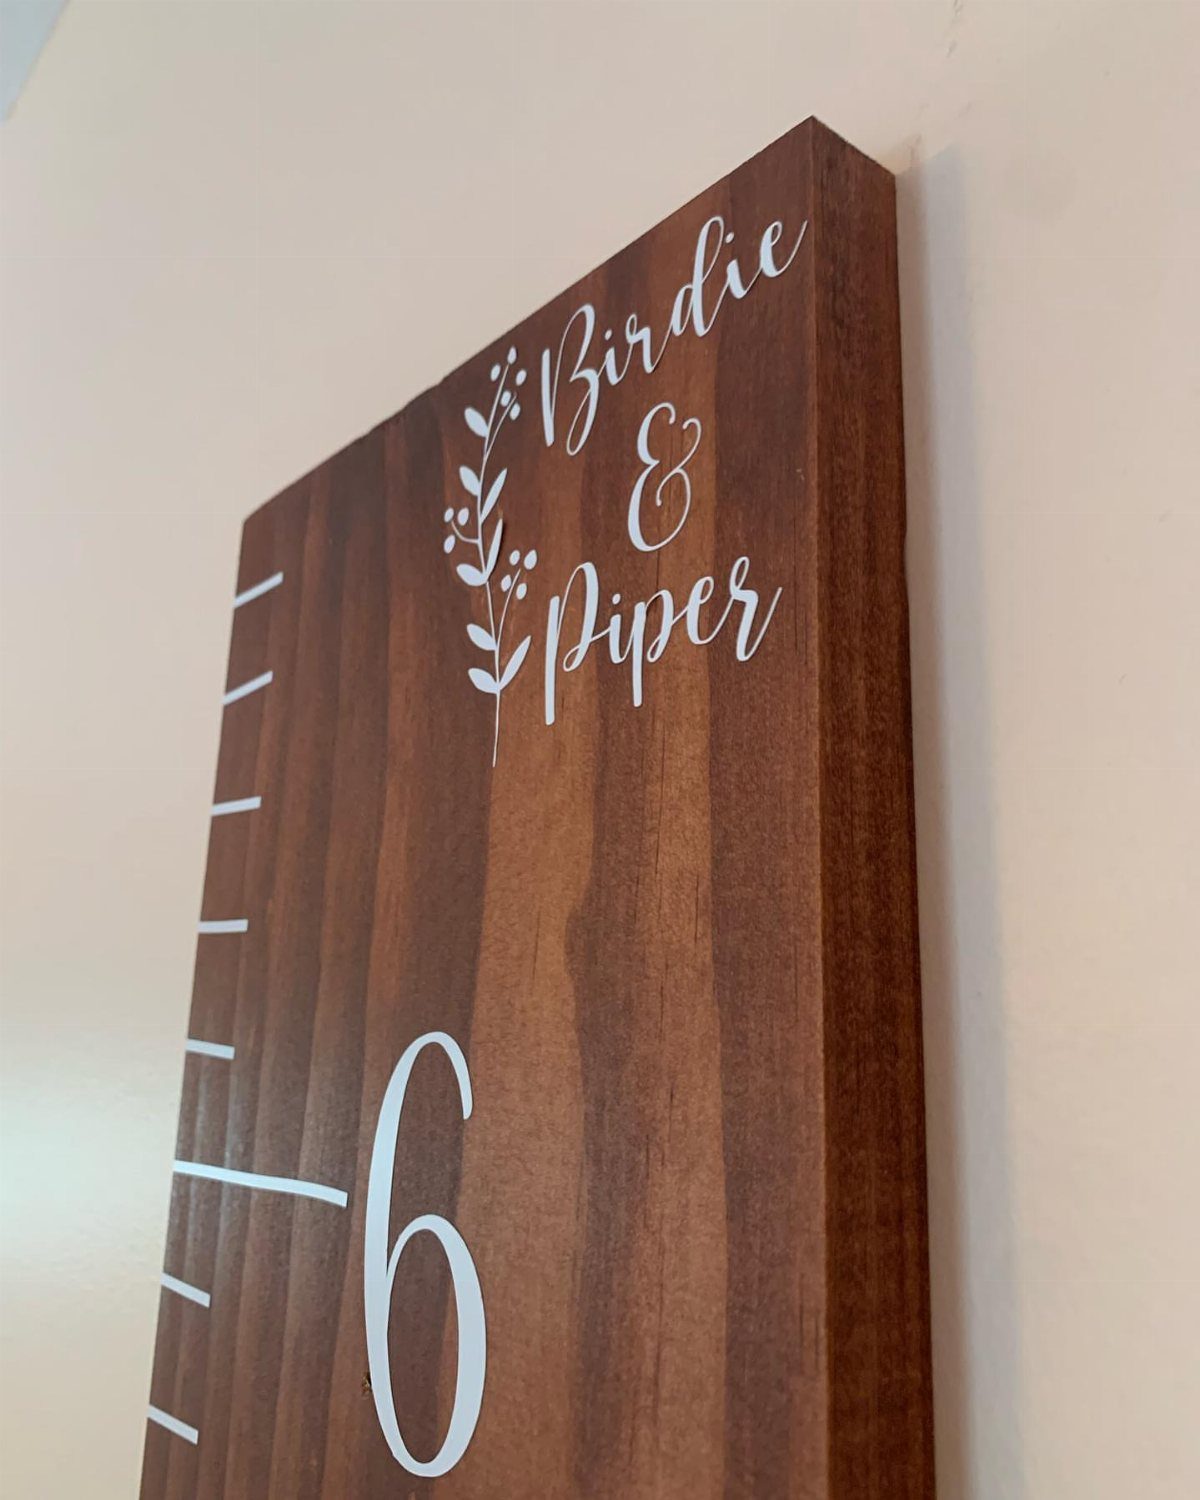
A wooden growth chart is decor that gets used: the measurement lines do the work, and the names turn it into a keepsake.
Pencil every line before heating the tool, and use a straightedge so the marks stay even. Spacing errors are hard to hide on a ruler, so measure twice.
Painting the lettering white, as on this one, makes the names pop against the burned lines.
8. Light Switch Cover
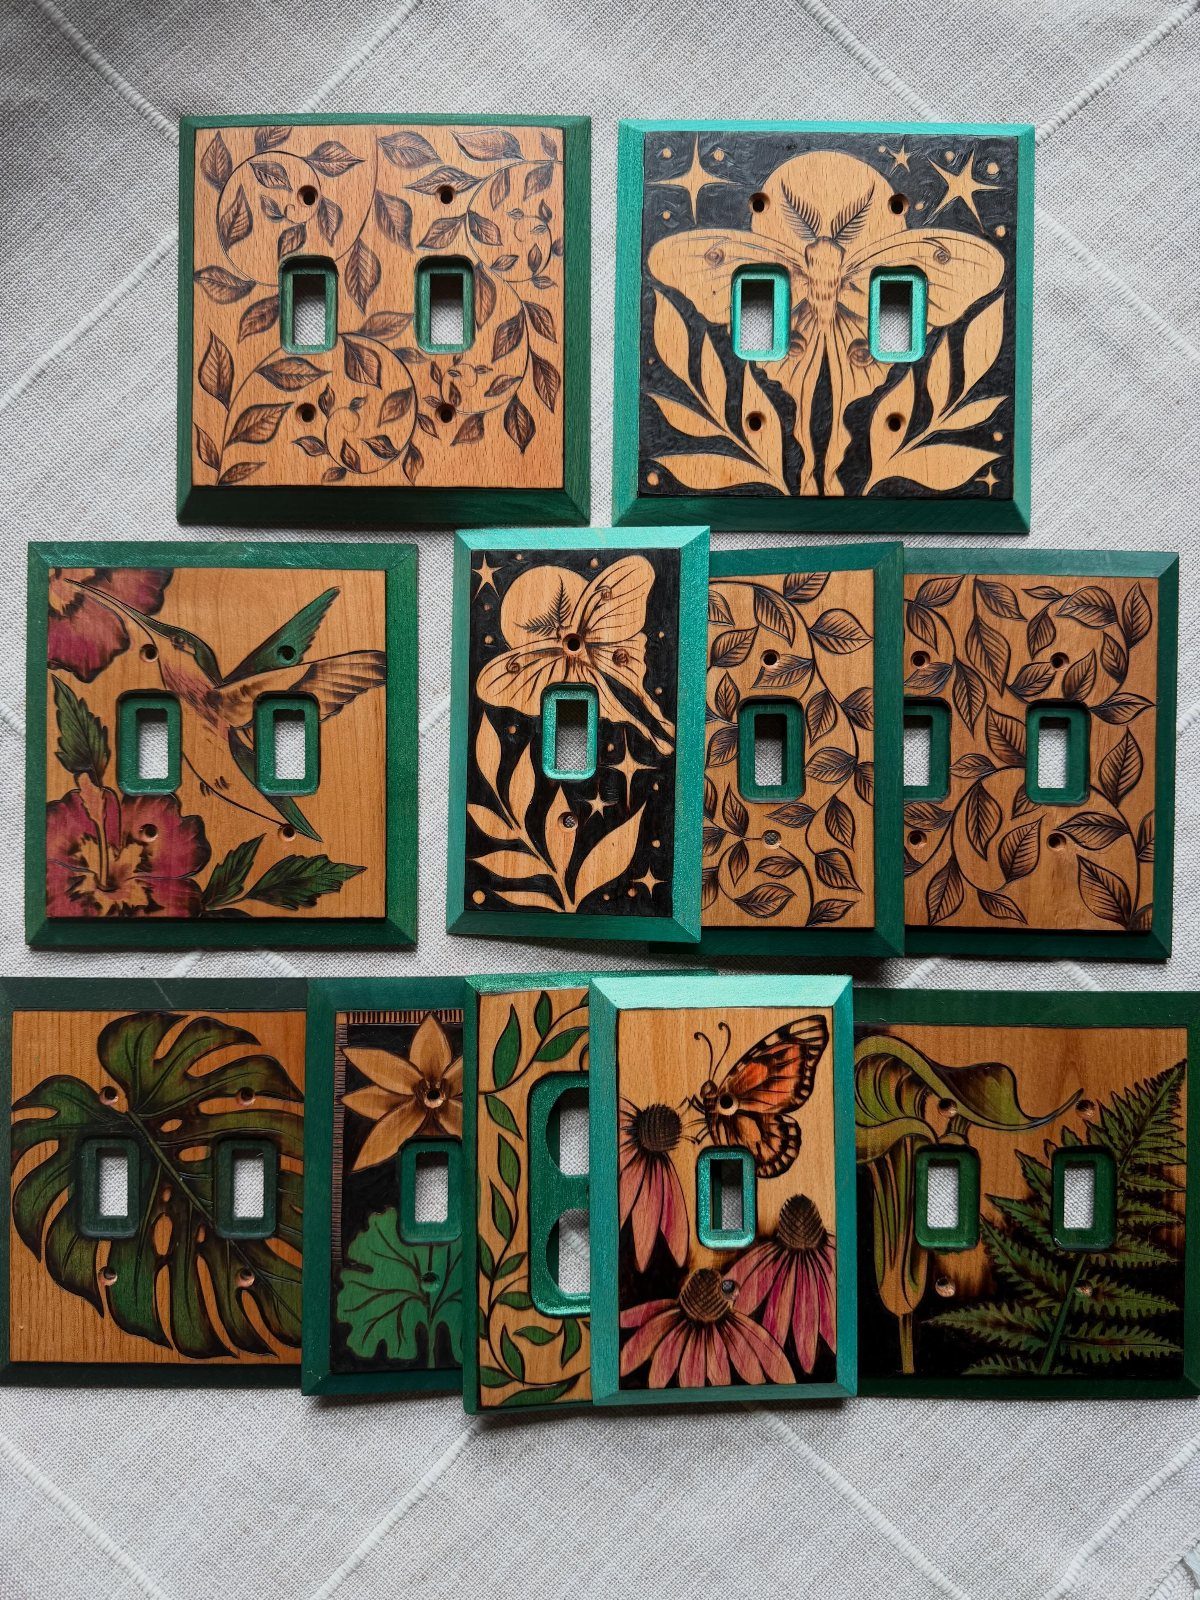
A light switch cover is a small flat panel, and that size is what makes it a low-risk first project. One botanical sprig or a single animal fits it with room to spare.
Sketch the design in pencil around the switch opening so nothing gets cut off. Burn the outline first, then add shading slowly, since fine leaves and fur need a pointed tip.
A little paint, used sparingly, adds color without hiding the burn. Make a few covers in one theme and a hallway of switches starts to match.
9. Wood Burning Pictures
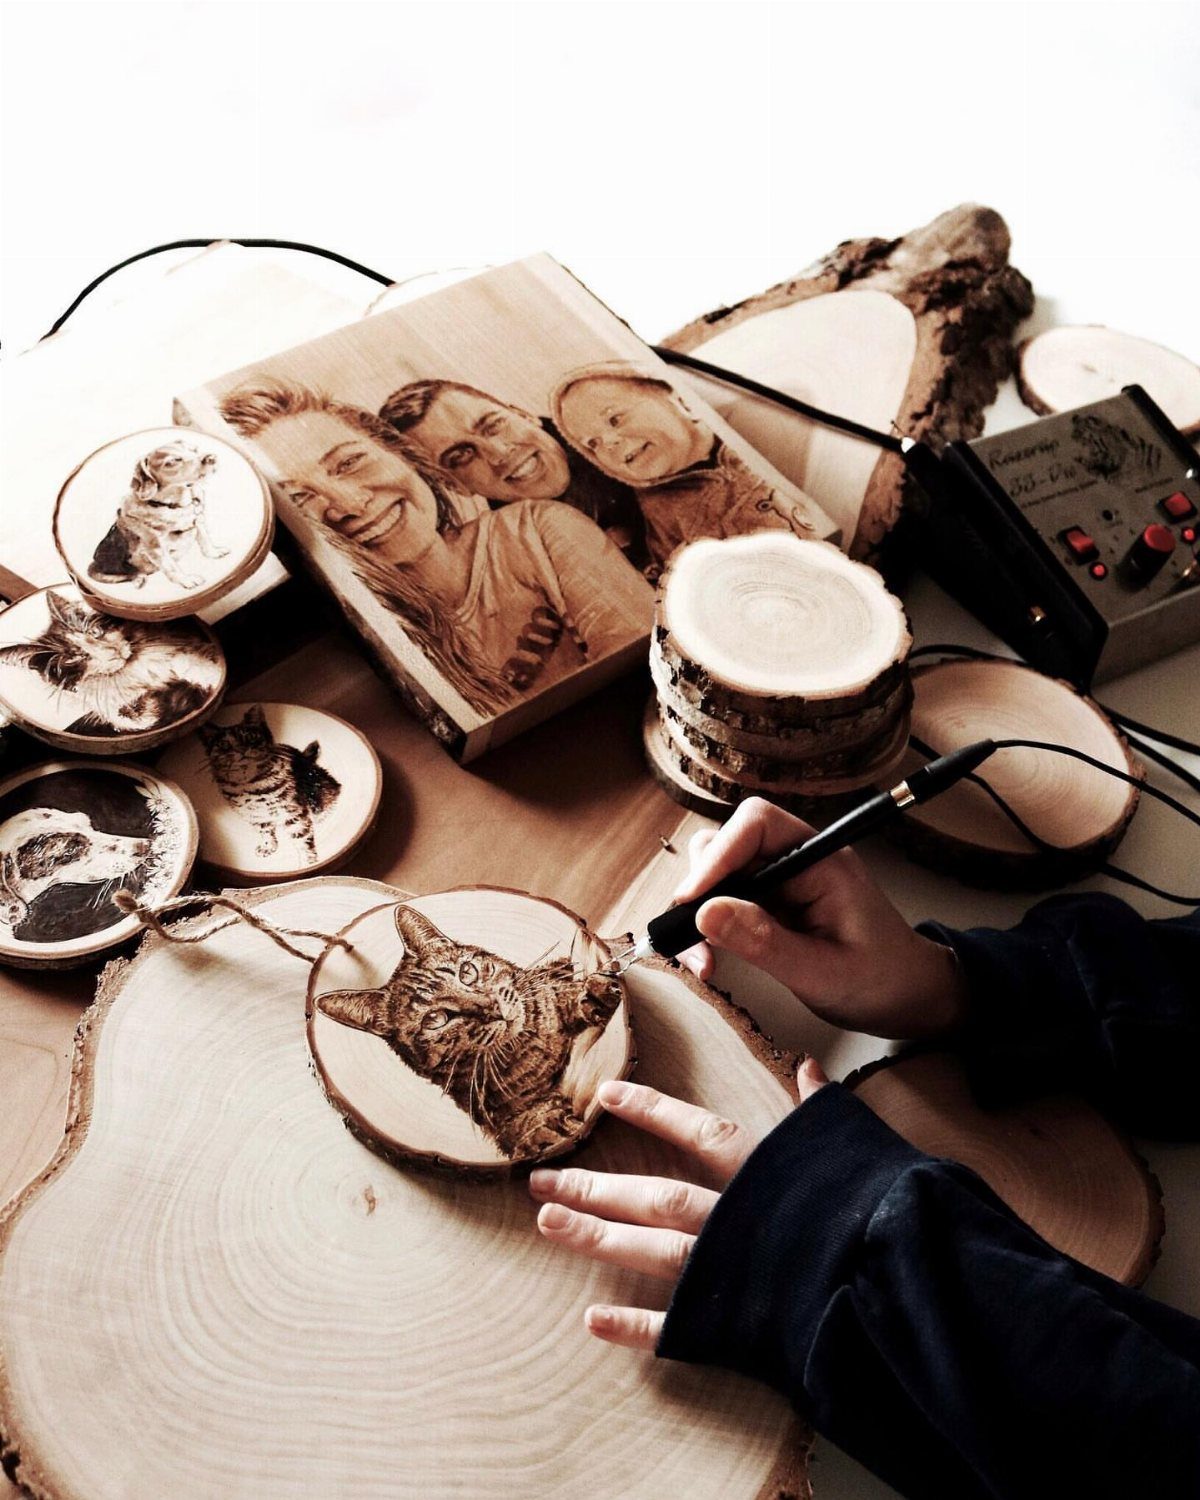
Burning a picture means drawing with heat, and a pet portrait on a wood slice is a good place to try it. Cats and dogs give you clear shapes, and the eyes carry the likeness.
Lightly pencil the outline, then burn the contours before any shading. Build dark areas in passes rather than one long press, because a tool held too long scorches the wood and can’t be undone.
Keep a spare slice nearby for testing how dark each speed makes a line.
10. Wood Burning Patterns
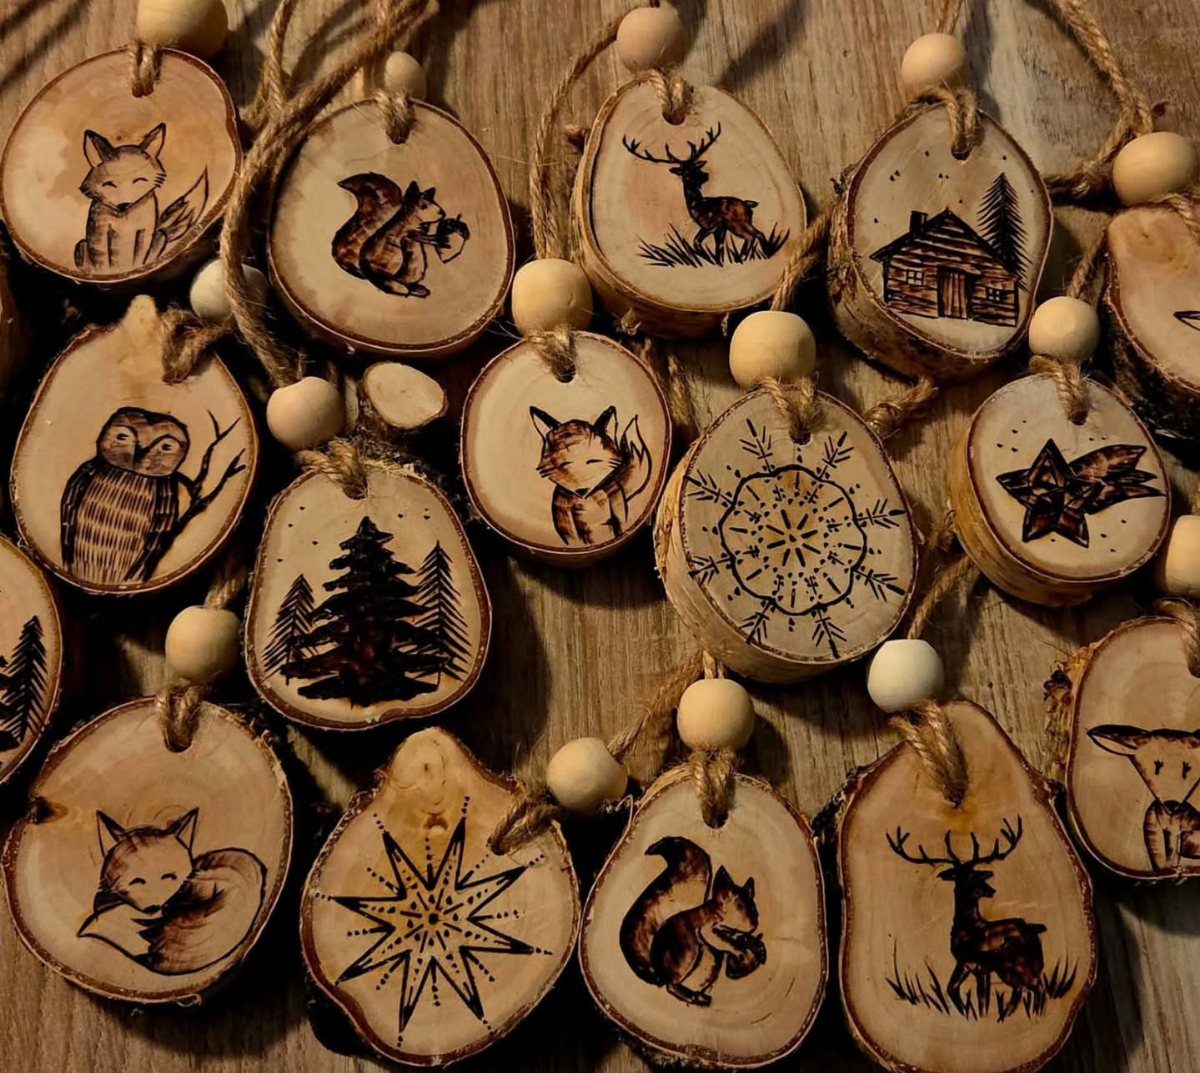
Patterns are the shortcut for anyone who doesn’t draw: trace a fox, a deer, or an owl onto a wood slice with a pencil, then burn right over the lines.
Choose designs with bold outlines, since they read well at this size. Repeat one pattern across several slices to make a matching set, or mix animals for variety.
Tracing paper and a pencil are all the transfer takes.
11. Wood-Burned Keychains
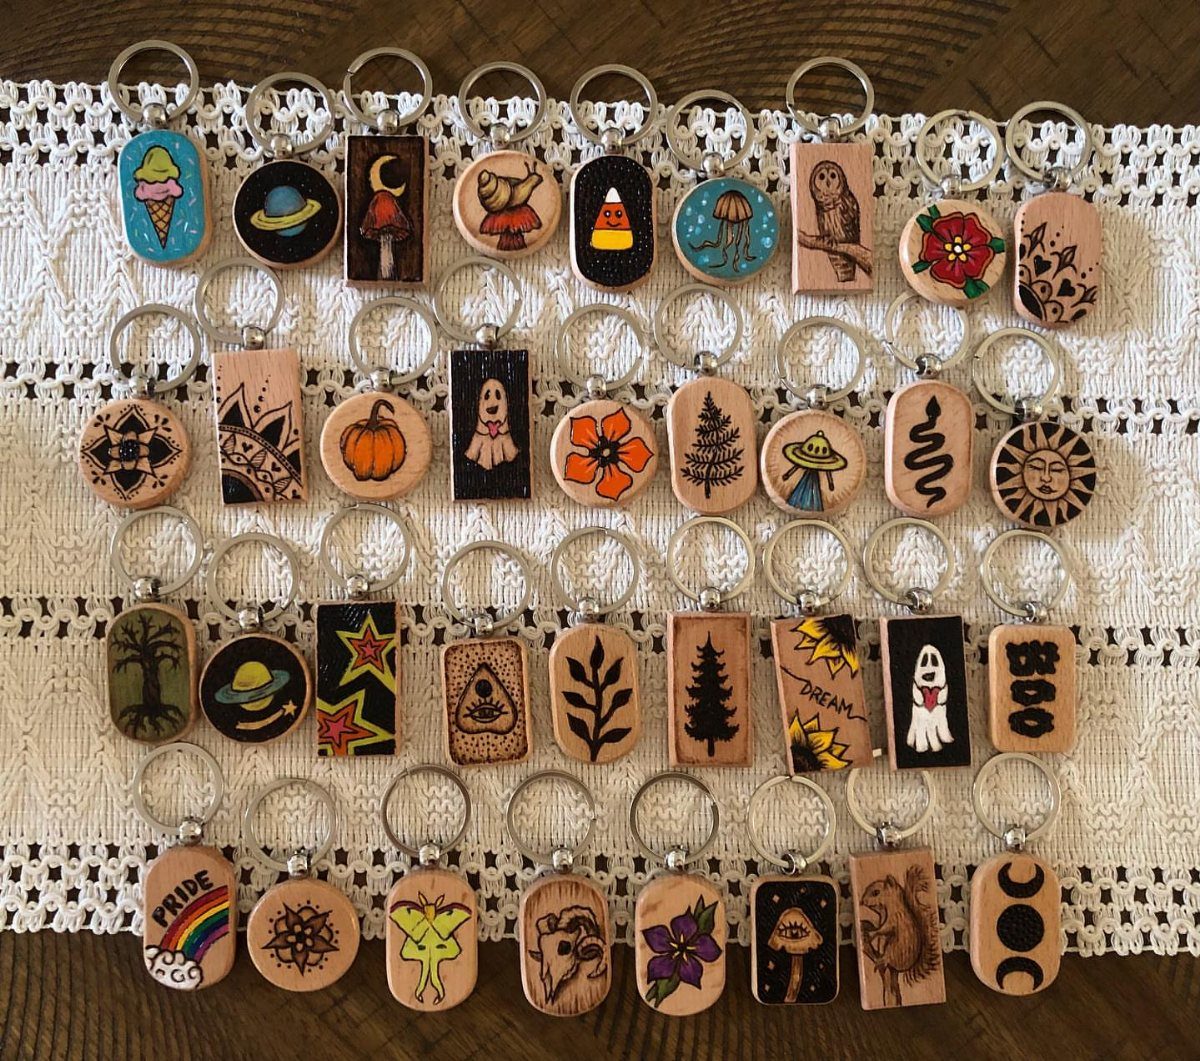
Keychains give you a tiny surface, so one image or one word is plenty. Planets, a small animal, or a short word like "DREAM" or "BOO" fit the round and rectangular blanks well.
Burn the design before the keychain hardware goes on, and pencil letters first so the spacing holds on a short line. Block capitals are easier to keep even than script.
They’re cheap to make in bulk, which suits gifting. Burn both sides only if you’re willing to spend the extra time.
12. Wood Slice Candle Holder
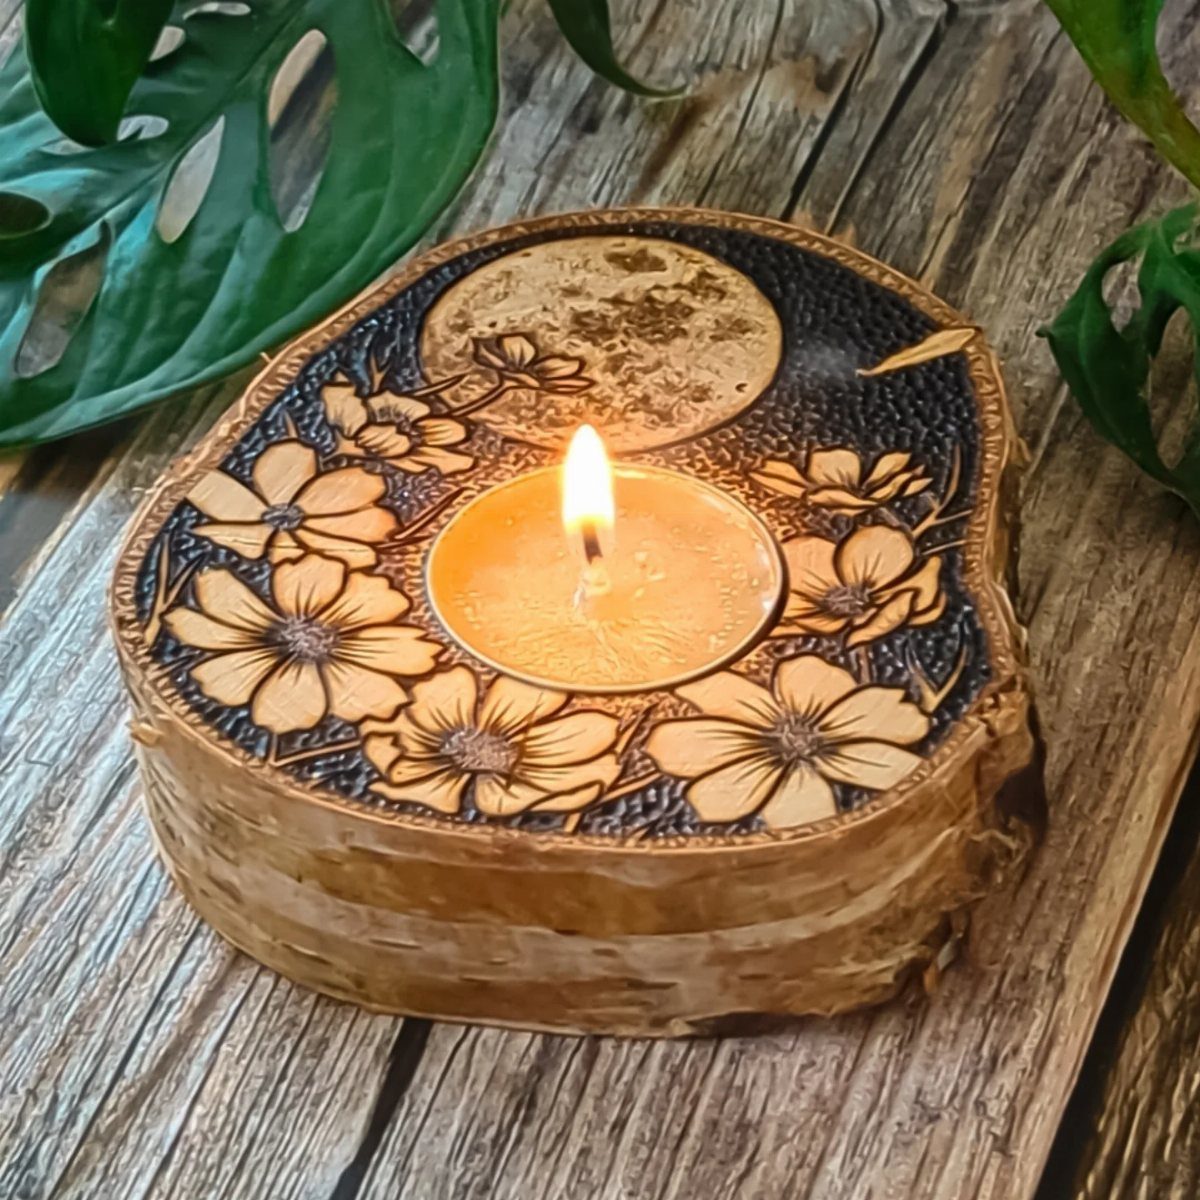
A wood slice with an inset for a tealight is about as simple as a candle holder gets, and a ring of burned flowers around the opening gives it a finished look.
Keep the florals to a loose border of leaves and blooms so the candle stays the focus.
Burn the design on the flat rim only, and use the tealight’s own cup so the flame stays inside the inset. Pencil the vine first, then add petals one at a time.
A weathered tabletop makes a good home for it.
13. Wood-Burned Tabletop
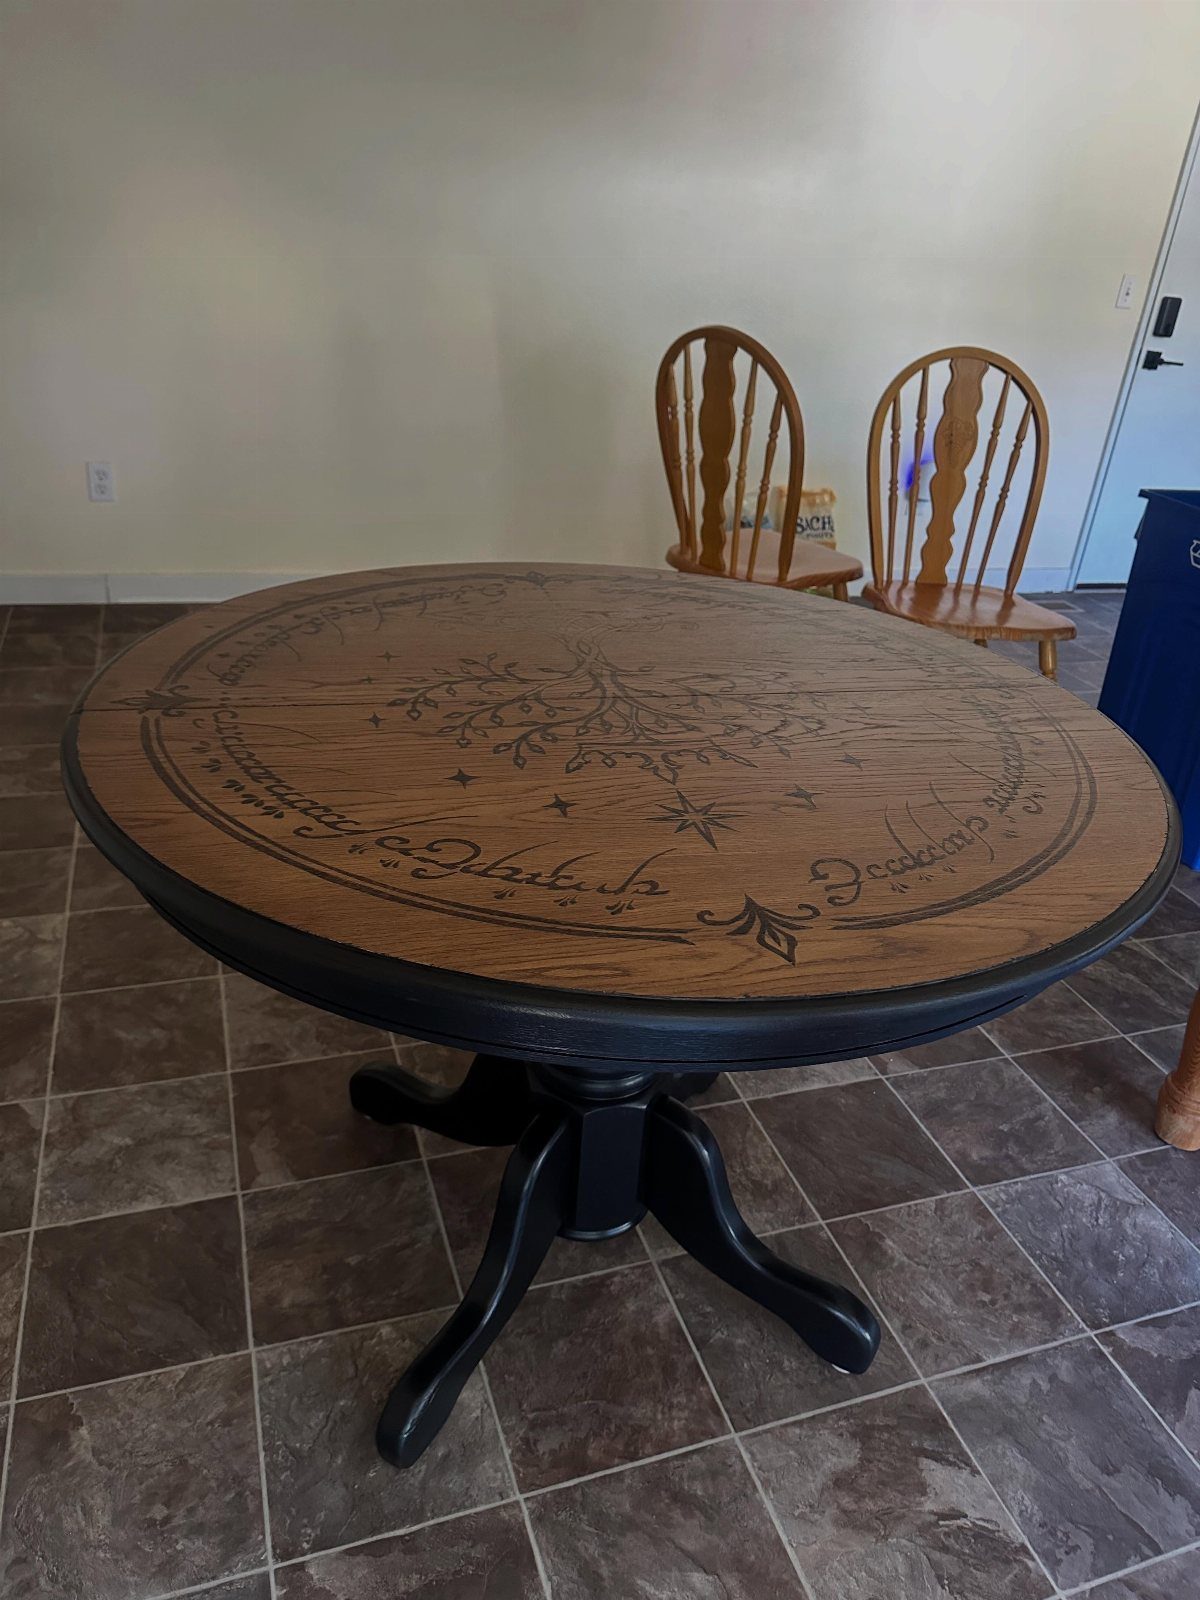
A round dining table turns wood burning into furniture, with floral designs and cursive lettering spread across the whole top. A round surface lets a wreath of blooms circle a name or short phrase in the center.
Pencil the layout first and mark the center point so the lettering sits true. This is the largest surface on the list, so plan on many sittings rather than one afternoon.
A small side table or a tray is a gentler way to try it on a budget.
14. Wood Slice Hanging Ornament
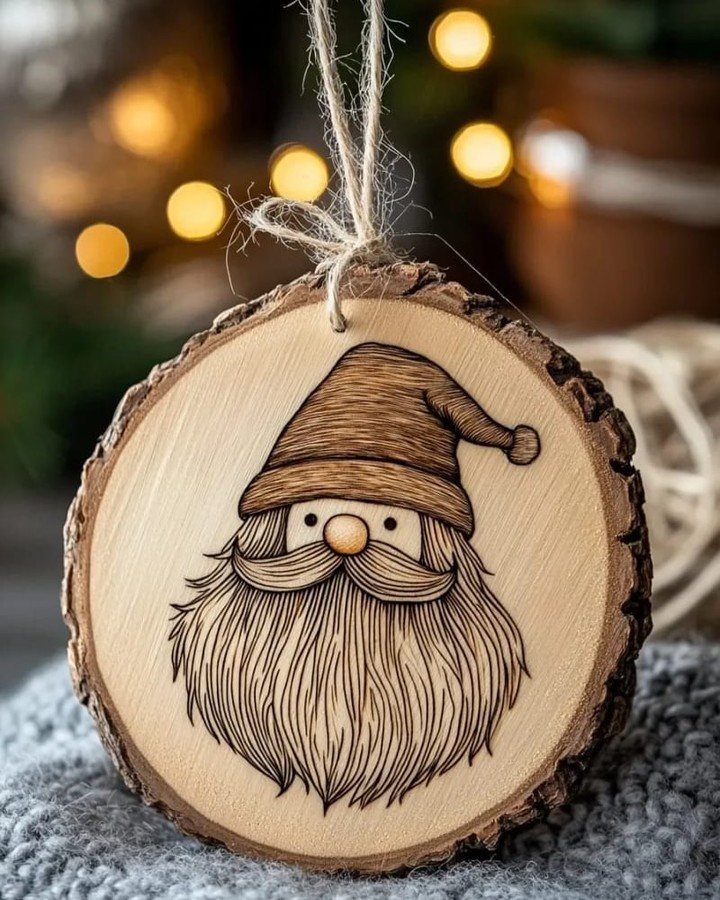
Gnomes suit a hanging ornament because the big beard and pointed hat fill a round slice with simple shapes. Leaving the bark edge untouched gives the burn a natural frame.
Burn the hat and face outline first, then fill the beard with short, flowing strokes to suggest hair. Slow passes give darker shading than pressing hard.
Drill the hole for the twine before you start burning, so nothing cracks the finished art. One slice is quick, so make a few.
15. Wood-Burned Clock
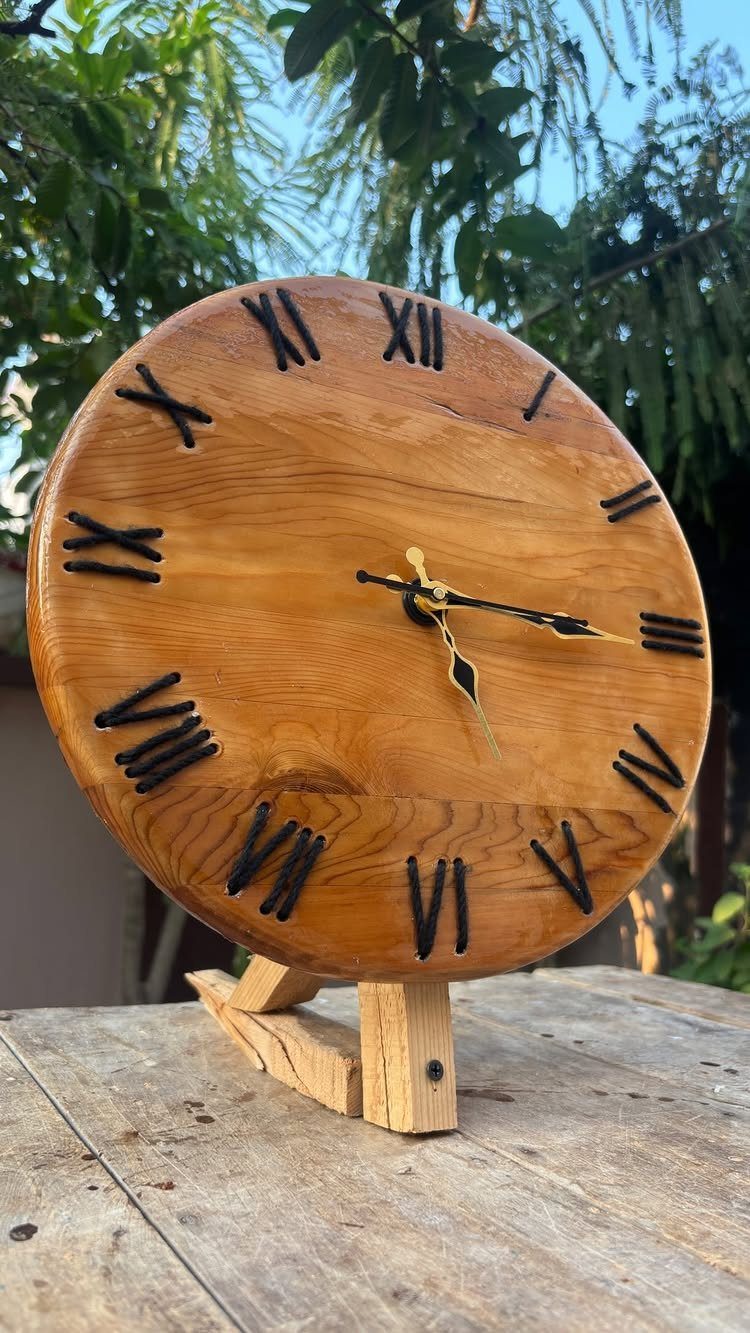
Roman numerals are all straight lines, and that makes a burned clock friendlier than it looks. Every number is built from a few bold strokes, so a beginner can keep them clean.
Mark the quarter positions in pencil first, then fill in the rest between them so the spacing holds. Use a ruler for the vertical strokes.
Burn the face before the clock hardware goes in. Gold hands against dark numerals look good on a light wood face.
16. Celtic Shamrock Decor
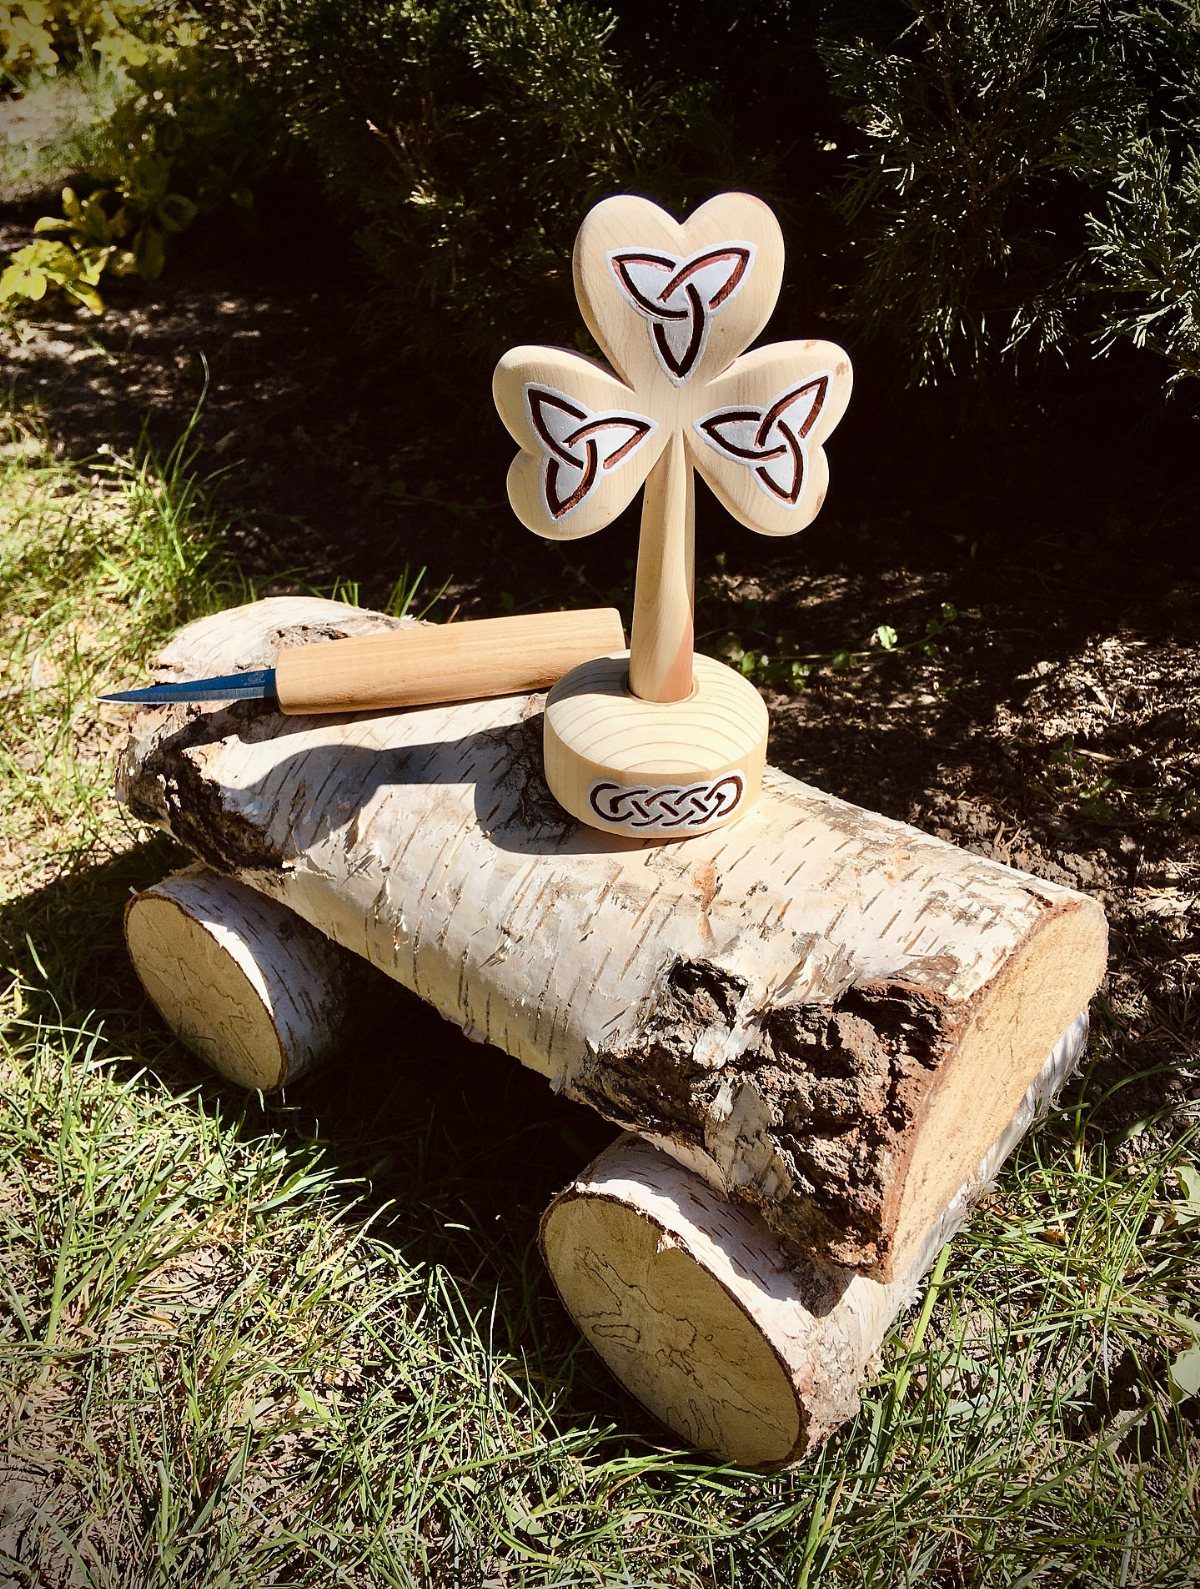
A shamrock is a forgiving shape for Celtic knots, since each leaf gives the burn its own small frame to fill. The knotwork stays readable even on a modest cutout.
Pencil the over-under lines first, then burn the outline of each band before filling the gaps. Work one leaf at a time so the crossings don’t blur together.
Set it on a log slice or a stand and it works as seasonal decor. It’s a patient project, so plan on more than one sitting.
17. Wood Slice Wall Art
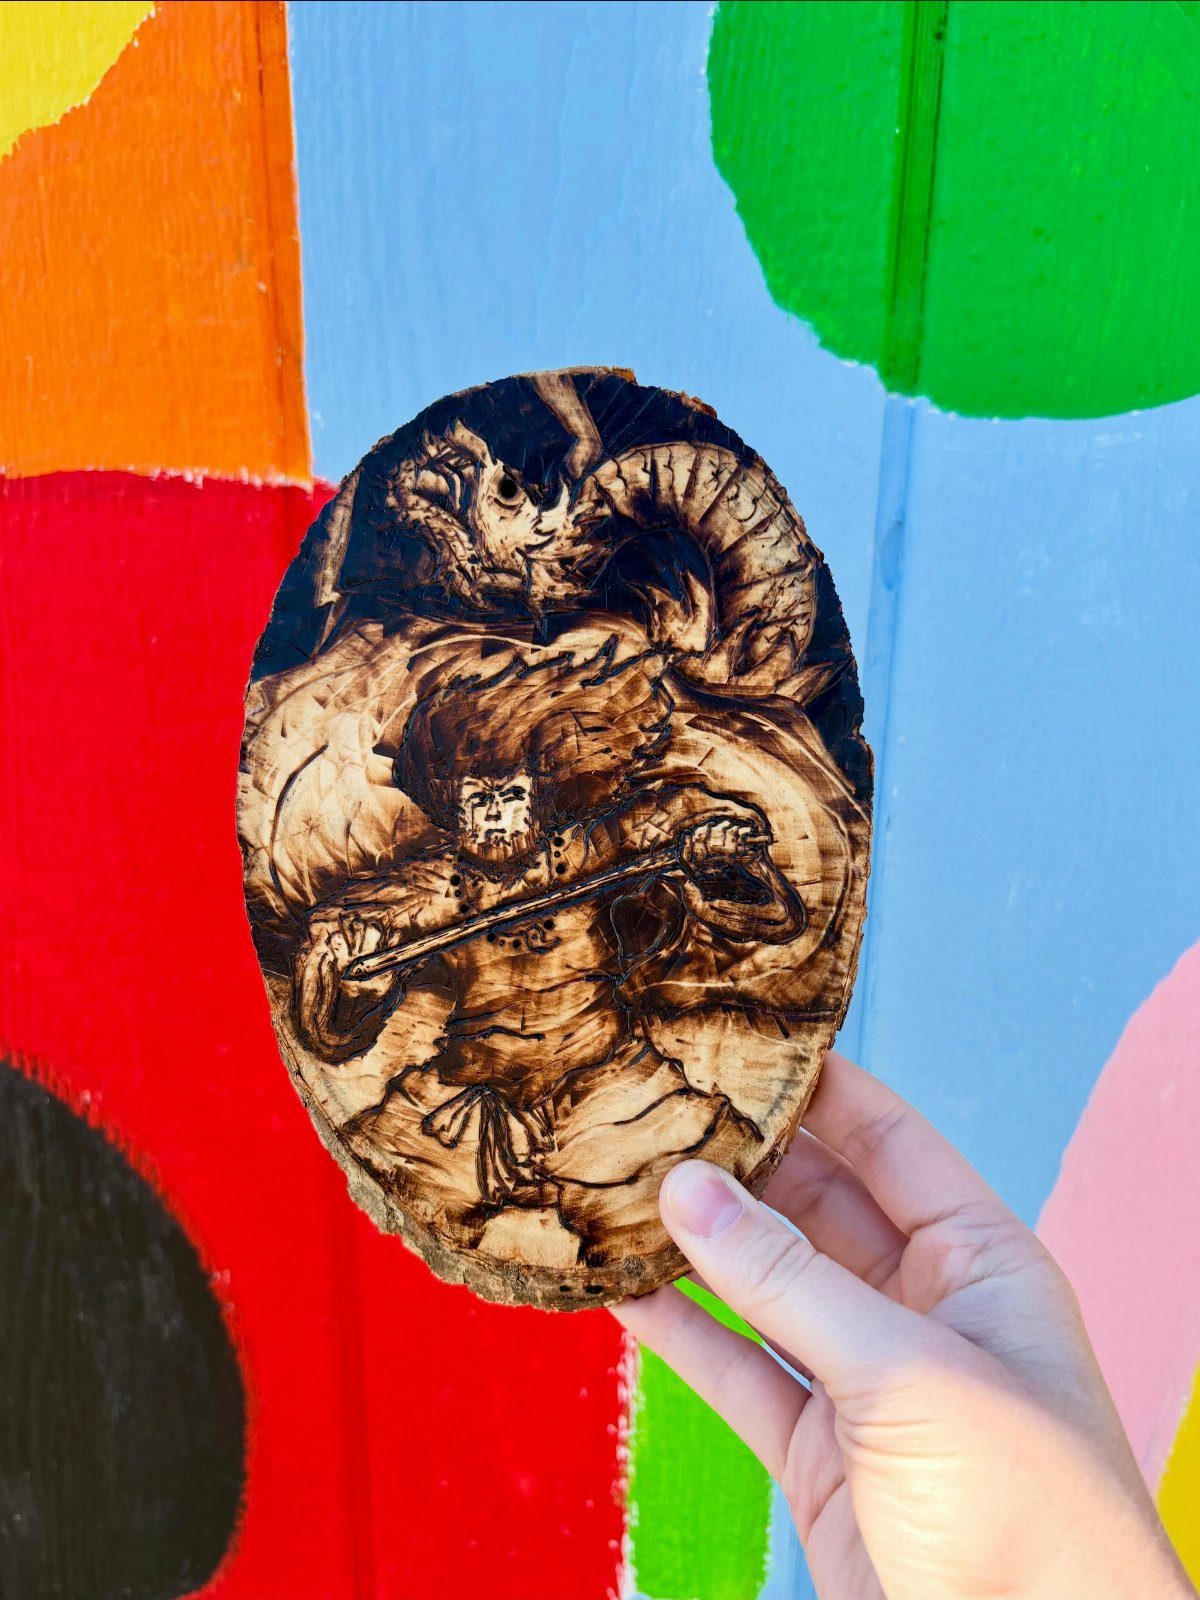
A fantasy battle scene packs knights, creatures and weapons onto one round slice, and the wood grain gives the sky and ground a texture for free. It’s a project for someone who already enjoys drawing with a burner.
Sketch the main figures large and keep the background simple. Burn the outlines first, then add shading in light passes so the busy scene doesn’t turn into one dark mass.
A small slice keeps the detail manageable. Give yourself several sittings.
18. Portrait Wooden Plaque
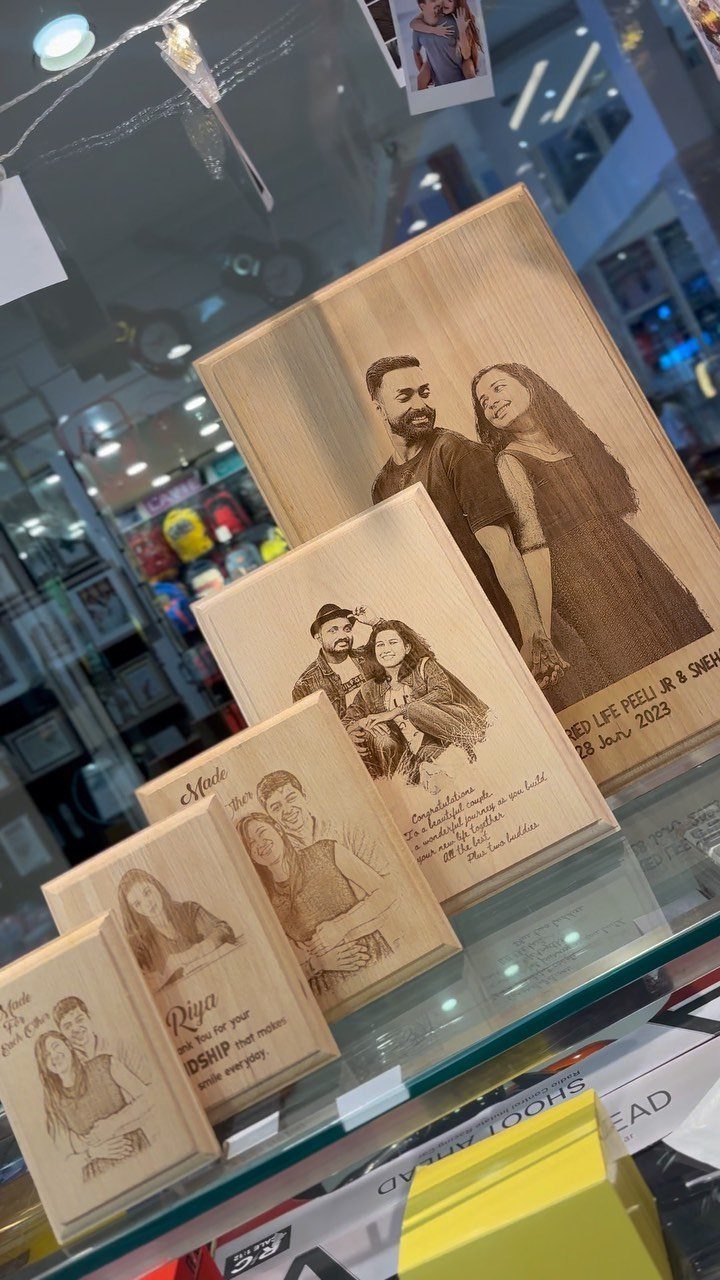
A portrait plaque is the most demanding gift of this kind, and the reward matches it: a couple’s faces burned into pale wood, with names and a date below.
Light wood matters here, because it shows soft shading better than dark wood.
Transfer the faces carefully in pencil and build the shading in light passes. Likeness lives in the eyes and the mouth, so slow down there.
Practice on scrap first, and add the names and date last.
19. Monogram Wood Slice
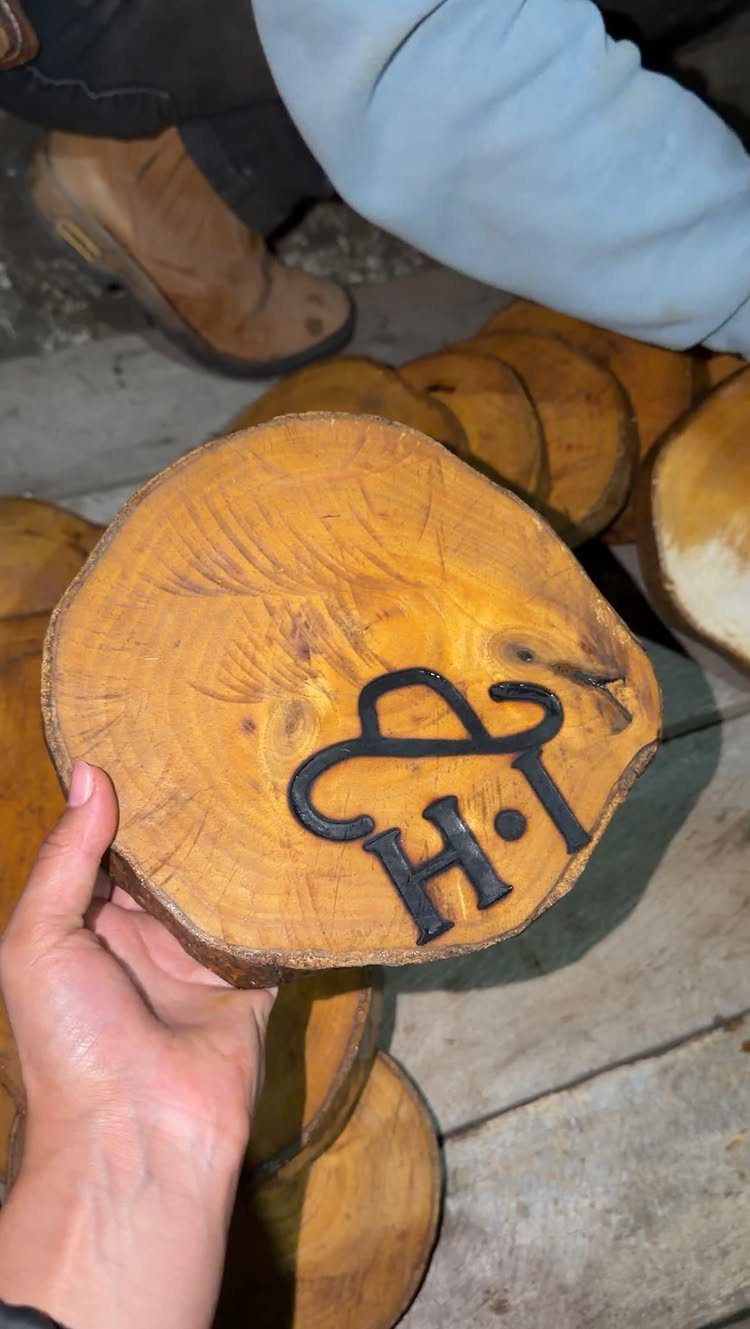
Initials burned onto a round slice, with a small swirl tucked beside the letters, make a monogram that looks planned without being complicated.
A bold letter in dark lines holds up well on bark-edged wood, and a flourish adds a bit of movement.
Pencil the letters first and keep the strokes thick, since a heavy outline is easier to burn evenly than a thin one. Add the swirl last, so it fills the space the letters leave instead of crowding them.
For a gift, use the recipient’s initials. Test the heat on the back of the slice before you start.
Best Woods for Wood Burning
Softwoods like pine burn easily, but the soft grain and sap make them less fun on small, detailed work. They suit larger pieces and bold silhouettes better.
Hardwoods like oak ask for more skill, and red oak’s sappiness and uneven grain can fight you. Birch, balsa and walnut are all fair choices for intricate designs.
Test any new wood on a small scrap before committing to a big blank. It’s better to dislike a scrap than a finished canvas.
Skip woods with high resin content. Cedar is one I’d leave alone, since it’s often called unsafe to burn.
Never burn pallet wood or MDF. MDF isn’t wood at all, just wood particles bound with glue, and the chemicals aren’t something to heat and breathe.
If you’re unsure about a species, look it up in a wood toxicity database first.
Wood Burning Techniques
3 techniques cover most of what you’ll burn: outlining, shading and stenciling. Practice on scrap until your lines come out the same width and depth every time.
Smooth the wood before you start. A rough surface makes the tip skip and wander, and sanding takes only a few minutes.
You can work freehand or from a stencil.
A stencil is a neat trick for crisp motifs: tape it down, trace the opening with a pencil, and burn along those lines before peeling it away. It also holds on curved surfaces better than a loose paper pattern.
For burning, a proper pyrography pen with swappable tips is the better pick, though a basic soldering iron will still leave a decent line. Whichever you use, keep the tip clean, since a gummed-up tip leaves messy lines.
Safety Tips for Wood Burning
Even safe woods give off smoke that irritates your lungs, so I wear a respirator fitted with organic vapor cartridges for every session. A paper dust mask isn’t the same thing.
Work in a well-ventilated space. Open a window and set up a fan so it pulls the smoke away from your face.
Gloves help with handling hot tools and warm blanks, though you still need to rest the burner in a proper stand between lines.
Check the wood before you heat it. Pallet wood, MDF and cedar are on my no-burn list, and a toxicity database can settle any doubt about other species.
Clean results are safer results, too. A well-kept tip, prepped wood and the right temperature mean you aren’t pressing hard and scorching the surface.
Frequently Asked Questions
What is a wood burning hobby called?
The hobby is called pyrography, which means drawing on wood with a heated tool. Most people simply say wood burning, and the 2 terms get used for the same craft.
What are some wood burning craft ideas for beginners?
Small, flat projects with bold outlines are the easiest to finish.
A round pair of earrings, a set of coasters with a swirling border and a name, a wooden spoon handle with initials, or a bookmark with one owl or a few mushrooms all work well.
Each has a small surface, so one simple design is enough and you can finish it in an afternoon.
What’s the best wood for wood burning art?
For fine detail, I reach for birch first, with balsa and walnut close behind. Pine marks quickly, but sap pockets and uneven soft grain fight you on small lines, so it suits big shapes and bold silhouettes better.
What woods should you never burn?
Pallet wood and MDF stay off my burn list: pallets may carry unknown treatments, and MDF is wood dust held together with glue, which gives off fumes you shouldn’t inhale.
Cedar is another one I pass on, since its oils and fine dust irritate many people.
What is the difference between pyrography and wood burning?
Pyrography simply means drawing with heat, and it works on wood, leather, gourds and other natural surfaces.
Wood burning is the same craft applied to wood only. For a project on a wood slice or plaque, the 2 names describe the same activity.






