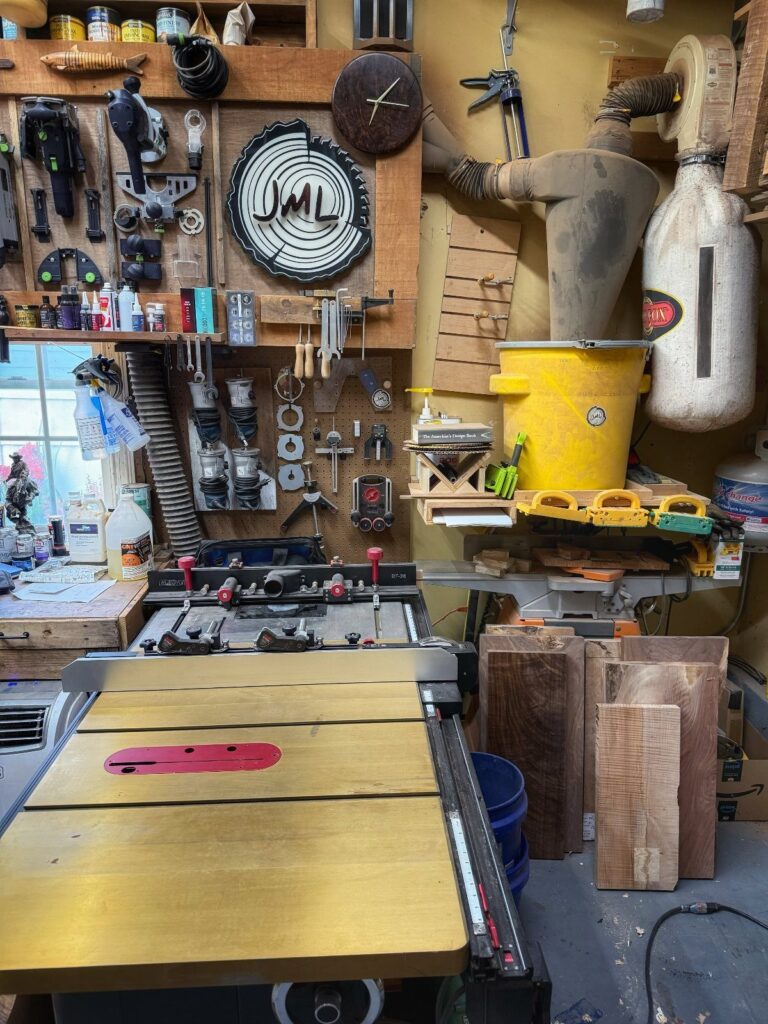
Which of these ideas fits depends on one fact: how much of your garage floor is left once the car is parked.
In a single-car garage, wall-mounted slatwall panels, overhead racks and anything on wheels earn their place, while a wood-burning stove or a coated floor suits a bigger bay you can give up for days.
The span runs from a portable shop vac at around $40–$50 to a wood-burning stove whose flue needs a pro to install it.
1. Wall-mounted Slatwall Panels
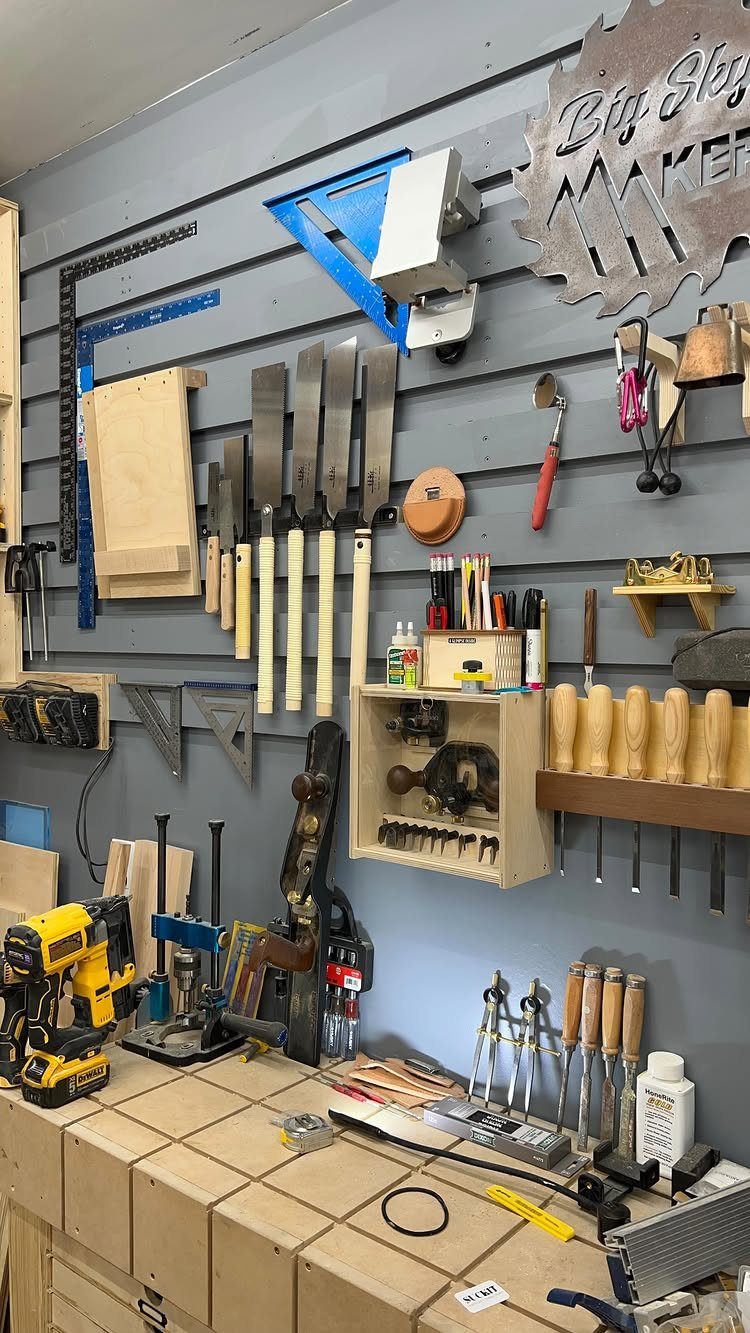
Slatwall turns a bare stretch of wall into tool storage, and it does it right above the bench where the work happens.
Saws and squares hang within arm’s reach, so nothing sits on the benchtop waiting to get knocked off or buried under offcuts.
Grey is a smart color choice here. Tools stand out against it, and you can see at a glance which hook is empty.
Mount the panels directly behind your bench first, then let the layout grow as your collection does. Hang the tools you grab most at shoulder height.
2. Overhead Storage Racks
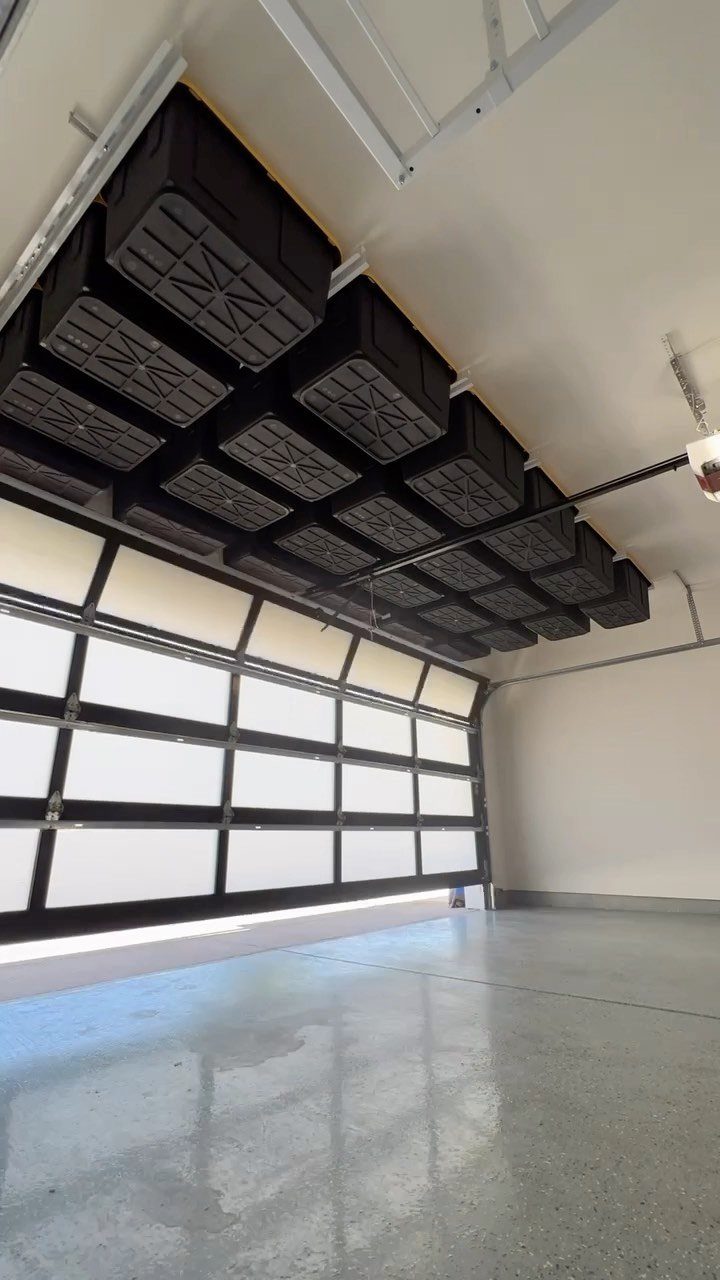
Look up before you build anything on the floor. A garage ceiling is unused space, and metal racks bolted overhead can hold bins right above the door, where nothing else fits anyway.
Black plastic bins with lids work well in a rack like this. They keep dust off whatever is inside, and the rack keeps them off your floor.
Put seasonal or rarely used items up there, such as holiday gear or spare hardware.
Anything you reach for weekly should stay lower. Label the bin ends so you aren’t pulling down three lids to find one box.
3. Garage Hooks for Bicycle Storage
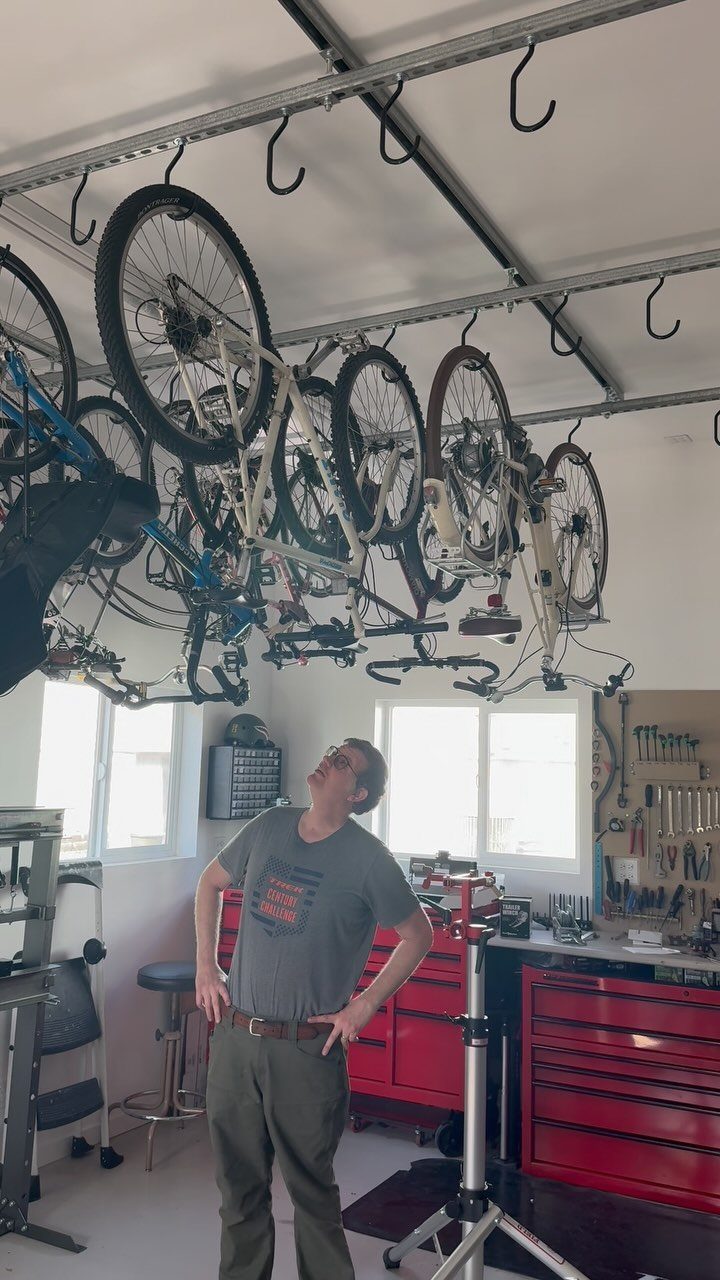
Bikes eat floor space faster than almost anything else in a garage, and hanging them from ceiling hooks gets them out of the way entirely. Several fit in the area one would take on the ground.
Hooks suit a shop that also holds a repair stand and tool chests, because the floor stays open for working. Space the hooks so the handlebars don’t tangle, and hang the bikes you ride most at the easiest reach.
Screw hooks into the ceiling joists rather than just the drywall. Bikes are heavy and awkward to lift, so keep the height reachable.
4. Clamp Storage
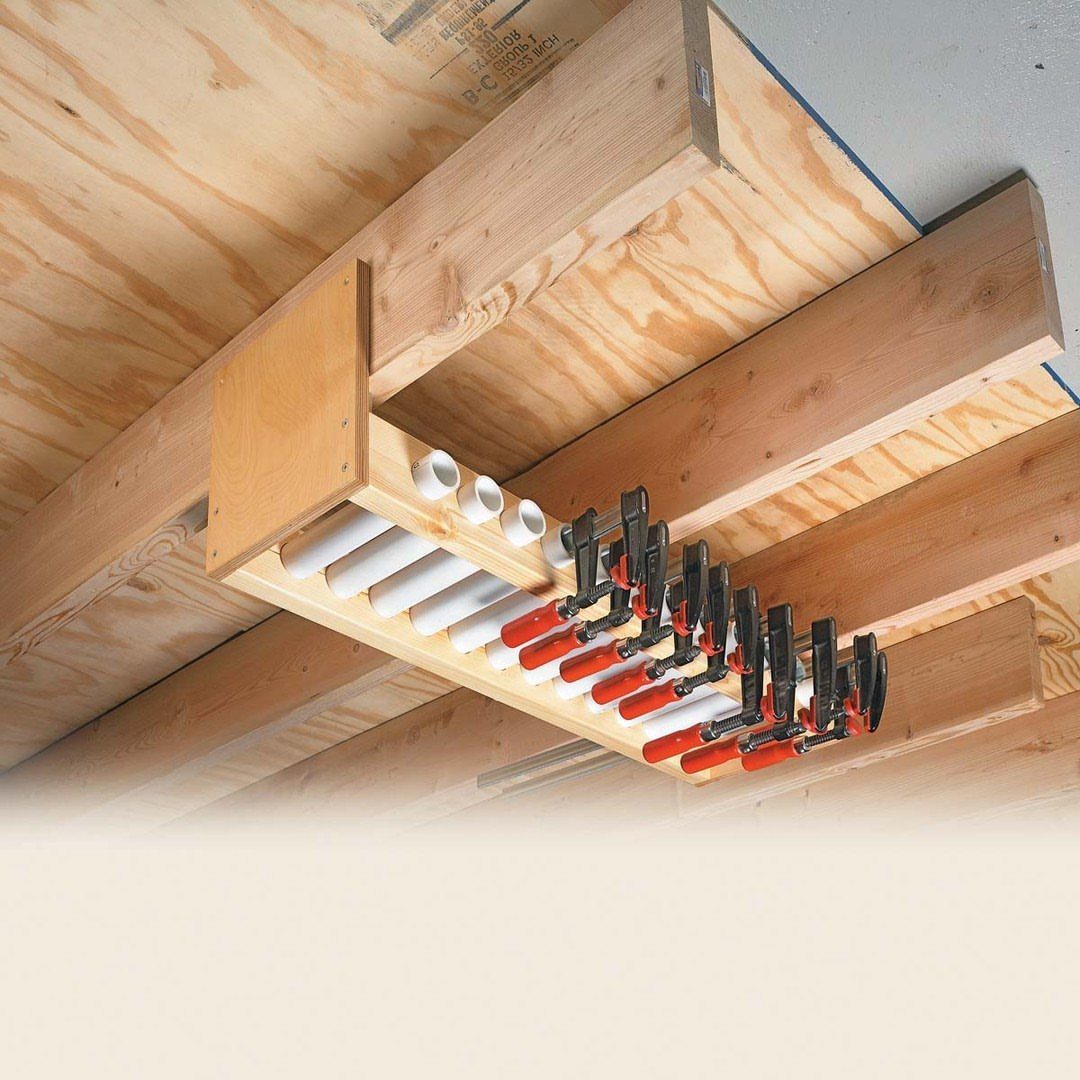
Clamps are bulky, and they never seem to be where you need them. A wooden rack screwed to the ceiling joists gives clamps a permanent home overhead, and it frees up bench and wall space you’d otherwise lose to them.
White PVC pipe sections work as the holders, and quick-grip clamps slide right in by their bars. It’s cheap, easy to cut, and you can size each pipe to the clamp it carries.
Attach the rack to joists, not just the ceiling surface, since a full set of clamps adds real weight. Keep the clamps you use often at the end nearest the bench.
5. Jars for Small Item Storage
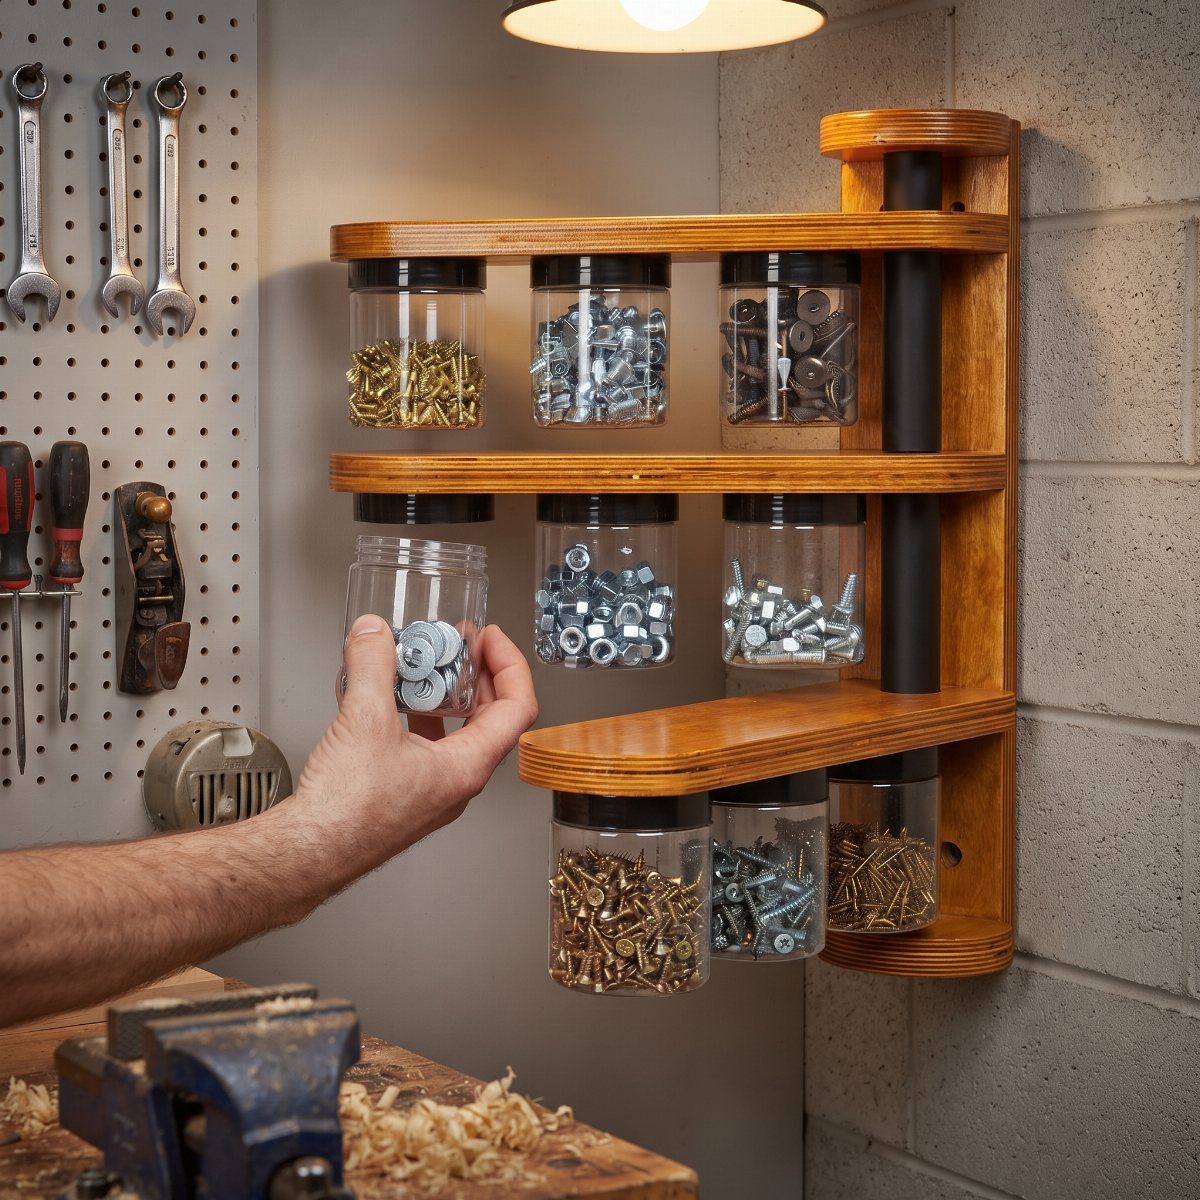
A hand full of nuts out of a clear jar beats digging through a coffee can every time.
Small plastic jars of screws, bolts and nuts, lined up on a wooden wall rack, let you see the contents without opening a thing.
Sort by type and size, one kind per jar. Clear plastic is my pick over glass in a shop, since a dropped jar won’t shatter on a concrete floor.
Build the shelf near the pegboard so fasteners and tools sit together. It’s an easy afternoon project with scrap wood and a few screws.
6. Garden Tool Storage Rack
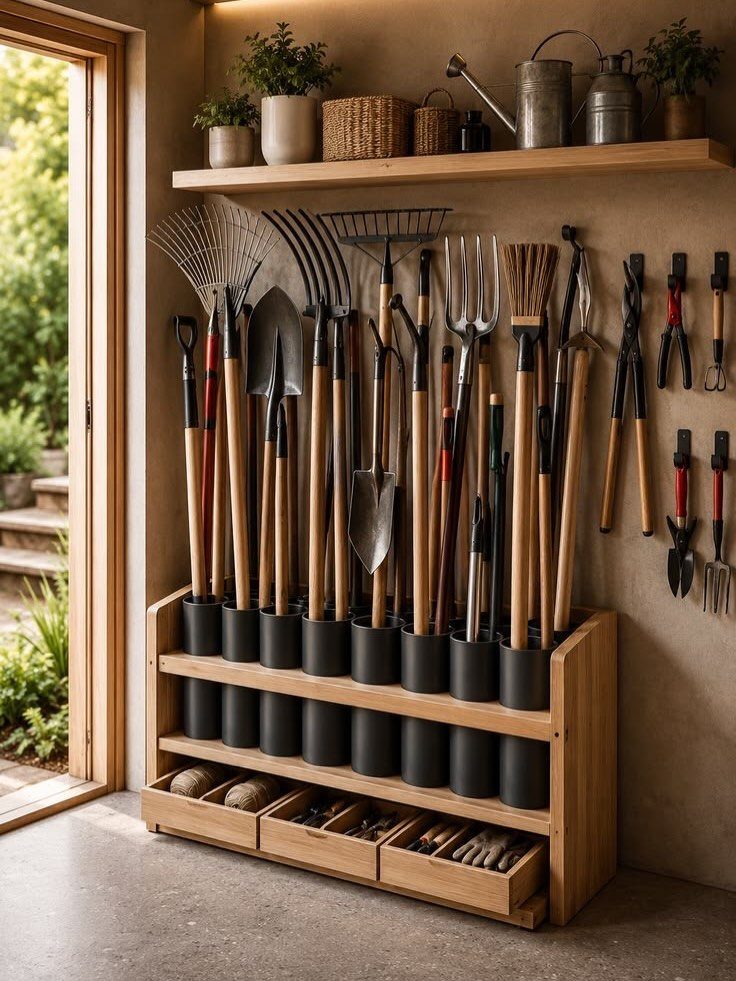
Shovels and rakes lean, slide and fall over, and a wooden rack with black cylinder holders stops that. Each long handle drops into its own tube, so the tools stand upright and stay separate.
Drawers below hold gloves, twine and hand trowels, while a shelf above fits pots or small supplies, so every small item has one place to go.
That mix of tall and small storage in one piece is why I like this design.
Build it from plywood or boards you already have, and size the cylinders to your fattest handle. It works well in a garage corner or a mudroom.
7. LED Lighting
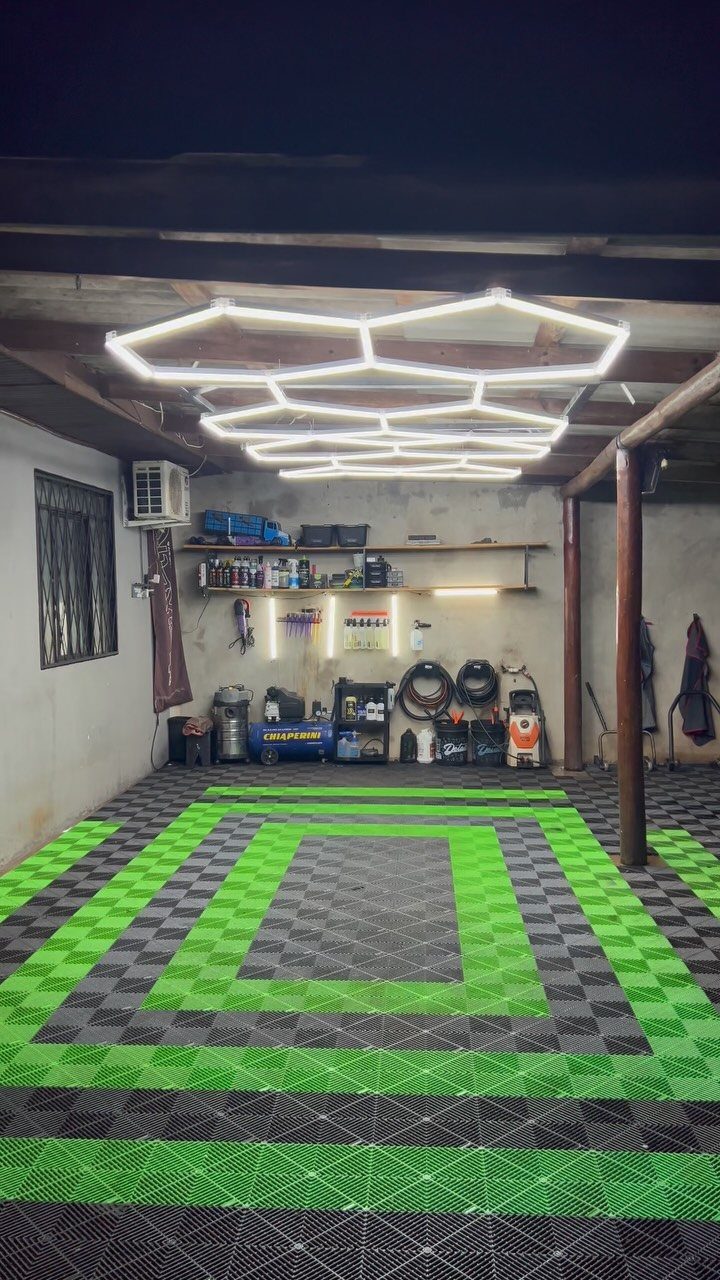
Hexagonal LED panels spread light across a garage ceiling in a pattern that looks like a honeycomb, and they make a dim two-car box feel like a proper shop.
Overhead light that covers the whole room means fewer shadows falling across the cut line.
A bright ceiling pairs well with a dark checkered floor, since the light bounces back up instead of disappearing into the concrete.
Hang the fixtures over the bench and the saw first, where you need to see a pencil line, then fill in the rest of the ceiling.
Wiring is the one step I’d hand to an electrician if you aren’t comfortable with it.
8. Portable Workbench
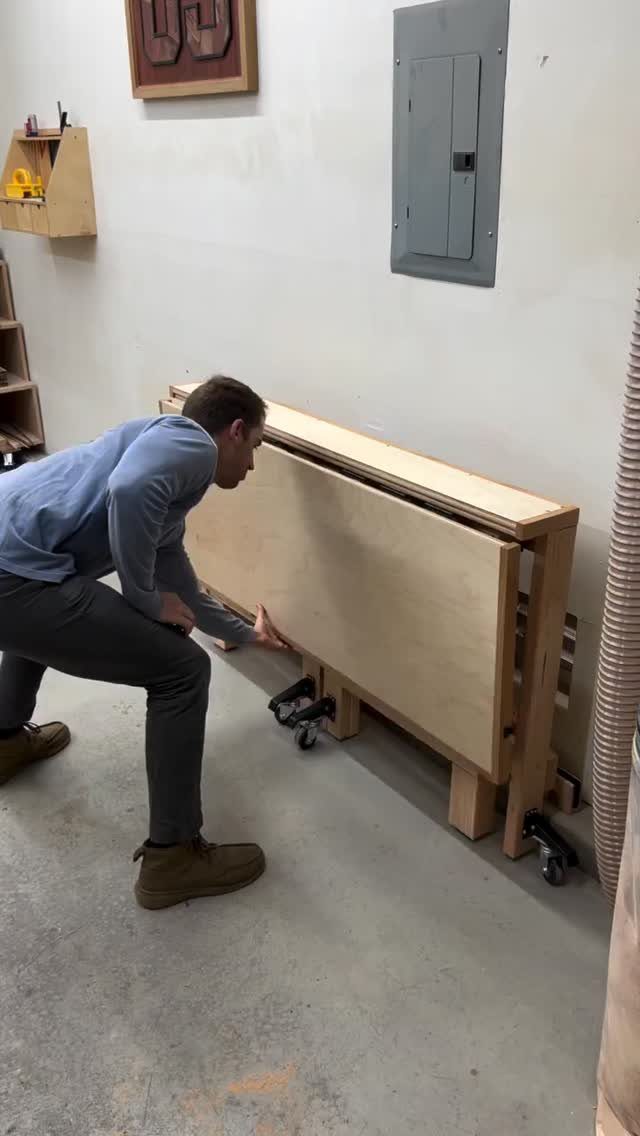
A workbench on locking casters goes wherever the job does, and that is why a small garage needs one.
Push it against the wall when you’re sanding, then roll it out to the driveway when you need room to swing a board.
Light plywood and 2x lumber make a good top and frame, and the pale wood is easy to wipe clean.
Choose casters rated well above the weight of the bench plus your heaviest tool, and buy the locking kind for every wheel.
Keep the top low enough that the bench doesn’t wobble when you push. A heavy vise bolted on one end will tip a narrow frame.
9. Wooden Shelves Along the Walls
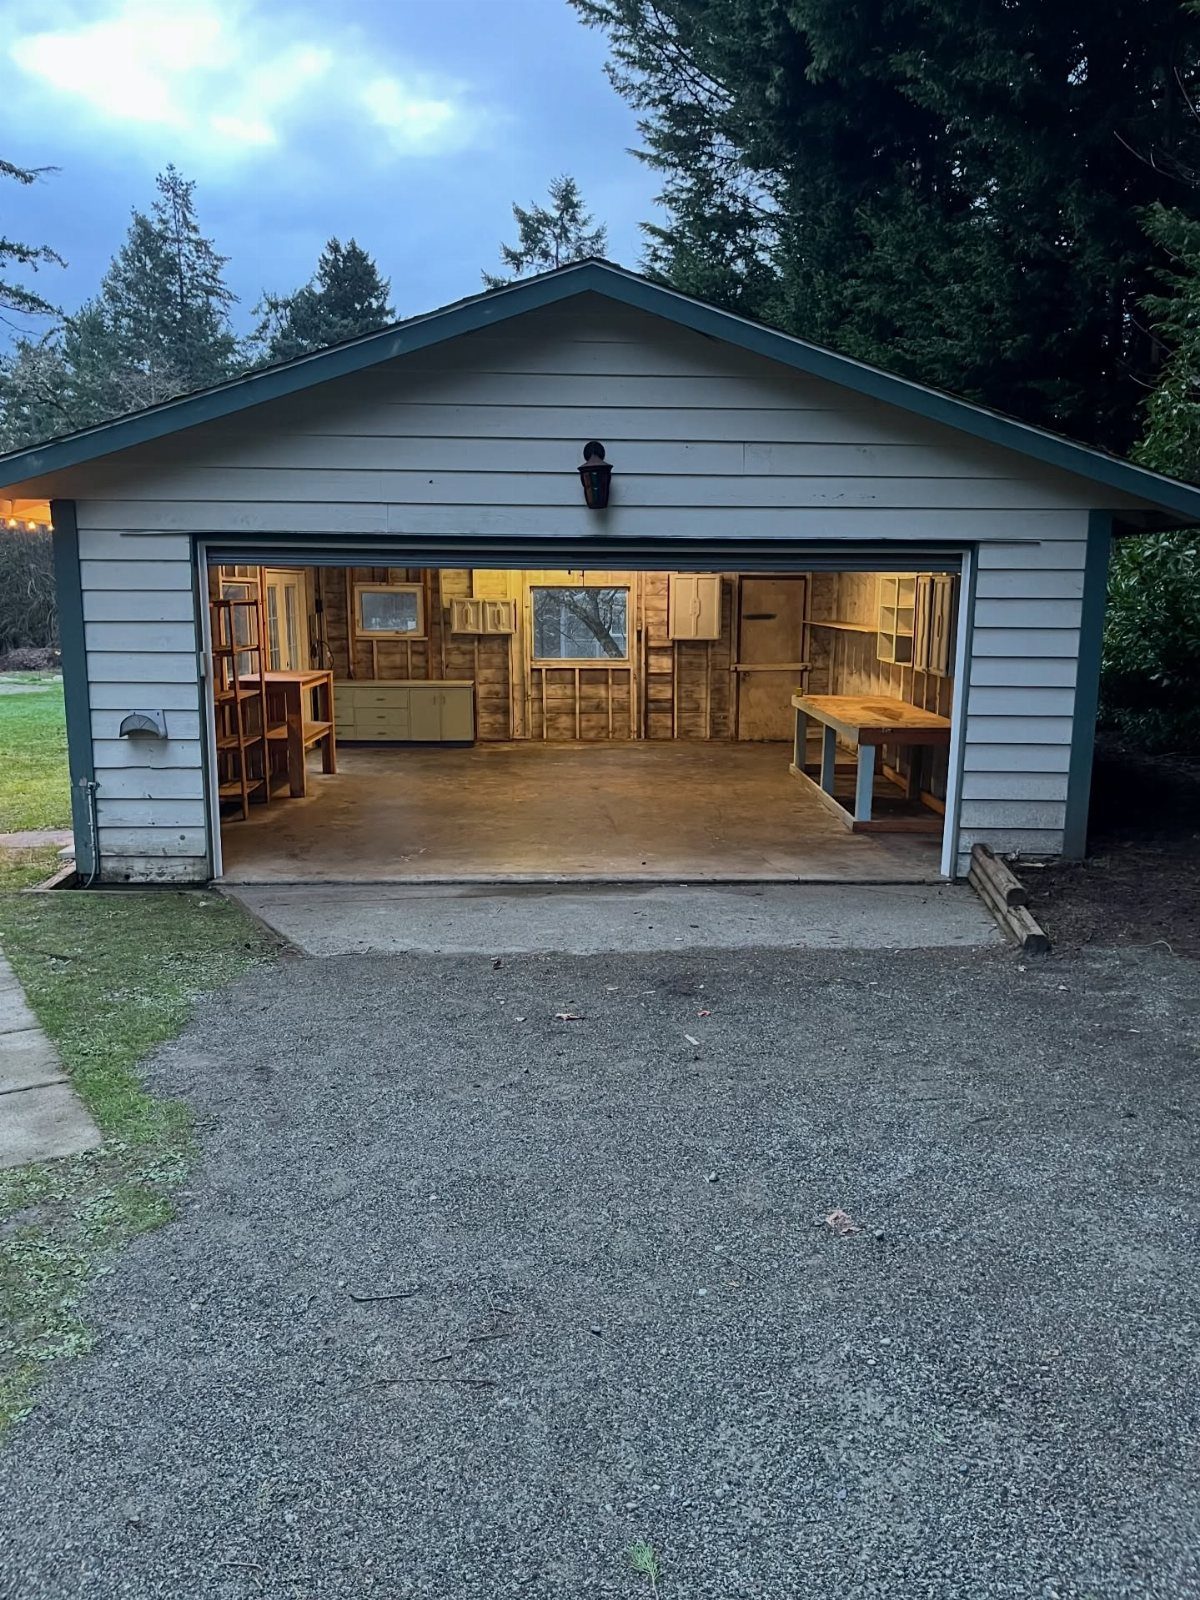
Shelves built from your own lumber can be sized to the exact box, jar or power tool they hold, which store-bought units rarely manage.
A run of open shelves along a garage wall, with a bench at one end, keeps everything visible.
Plywood and common boards are enough for the job. Fasten the uprights into the wall studs, and keep heavy items on the lowest shelves.
Leave a few shelves taller than you think you need. Lumber, cases and clamps always outgrow the first plan, and a shelf you can still adjust is easy to live with.
10. Workbench Outfeed Table
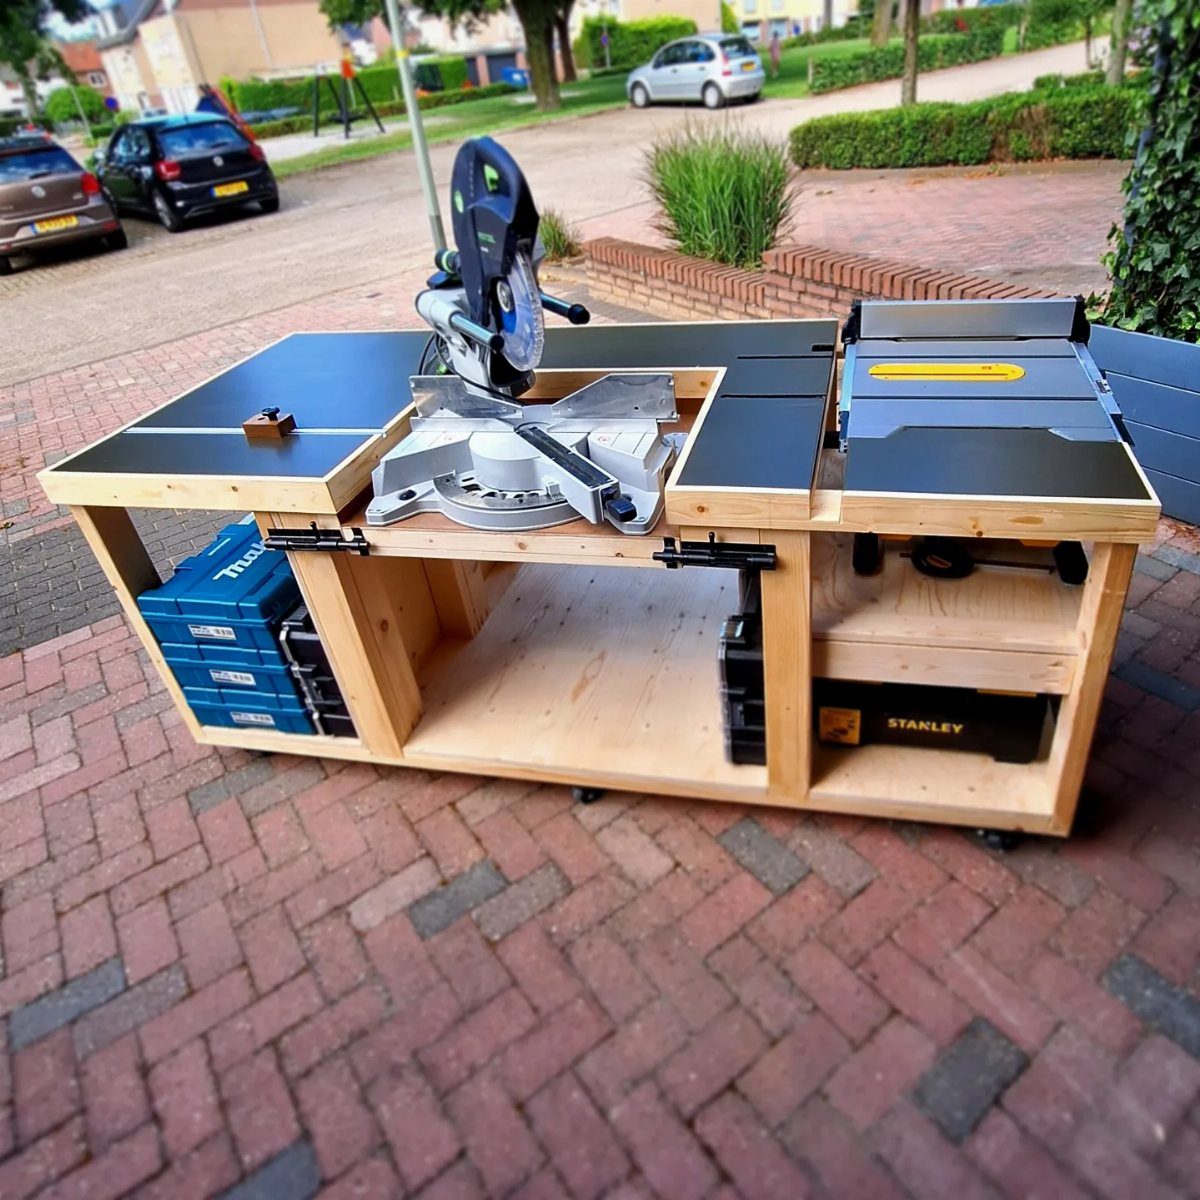
A bench built to the same height as your miter saw table turns long boards into a steady, supported cut.
The saw sits in the middle of the bench, and the flat tops on either side give long boards something to rest on while you cut.
Match the surface height to the saw bed with a straightedge before you fasten anything down. A black top hides saw marks and glue drips well, though it shows dust.
Open space under the bench holds toolboxes, so the whole station doubles as storage. Build it from plywood and 2x lumber, and plan on a weekend.
11. Floor Coating
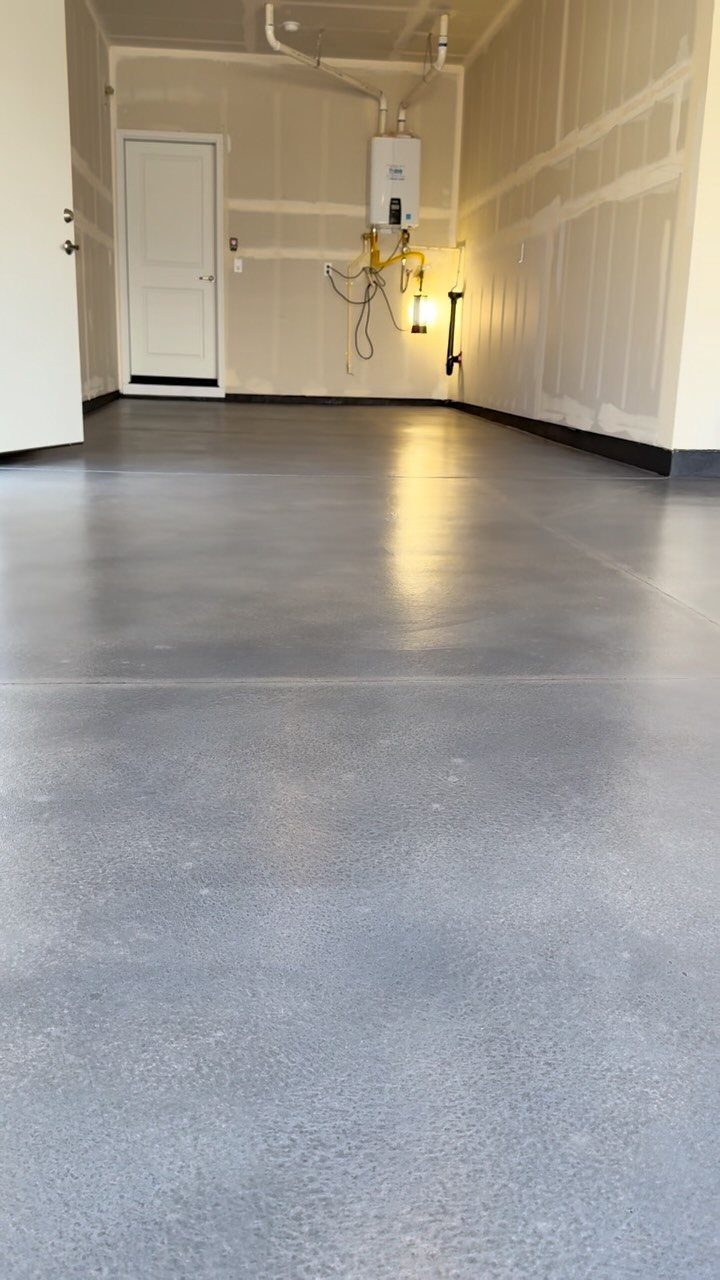
A coated concrete floor is easier to sweep, resists stains and bounces more light back into the room. Grey epoxy gives a clean, glossy surface, and sawdust and spilled finish wipe up instead of soaking in.
Prep decides how long the coating lasts: clean the slab, degrease any oil spots and let it dry fully before you roll on the first coat. Skipping that step is how floors peel.
Gloss is slippery when wet, so I’d add a fine grit to the topcoat if the garage ever gets damp. Expect to give up the garage for a few days while it cures.
12. Portable Shop Vac
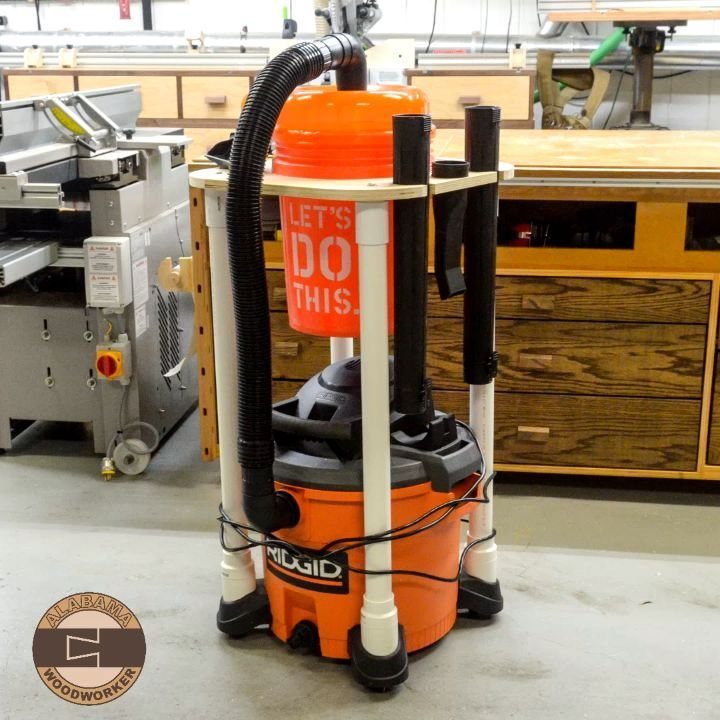
A shop vac living inside a custom wooden frame stays out of your walking path and keeps the hose where you can grab it.
Build the frame with a cutout for the canister, and add casters so it rolls to whichever tool is making the mess.
A frame also gives you a place to hang the hose and cord, which otherwise end up in a tangle on the floor. Size the opening to your vac, with enough clearance to lift the lid and empty the drum.
Connect it to the sander or saw, and most dust never reaches the air. It’s a small build, easy to finish in an afternoon from scrap plywood.
13. Tools on Wheels
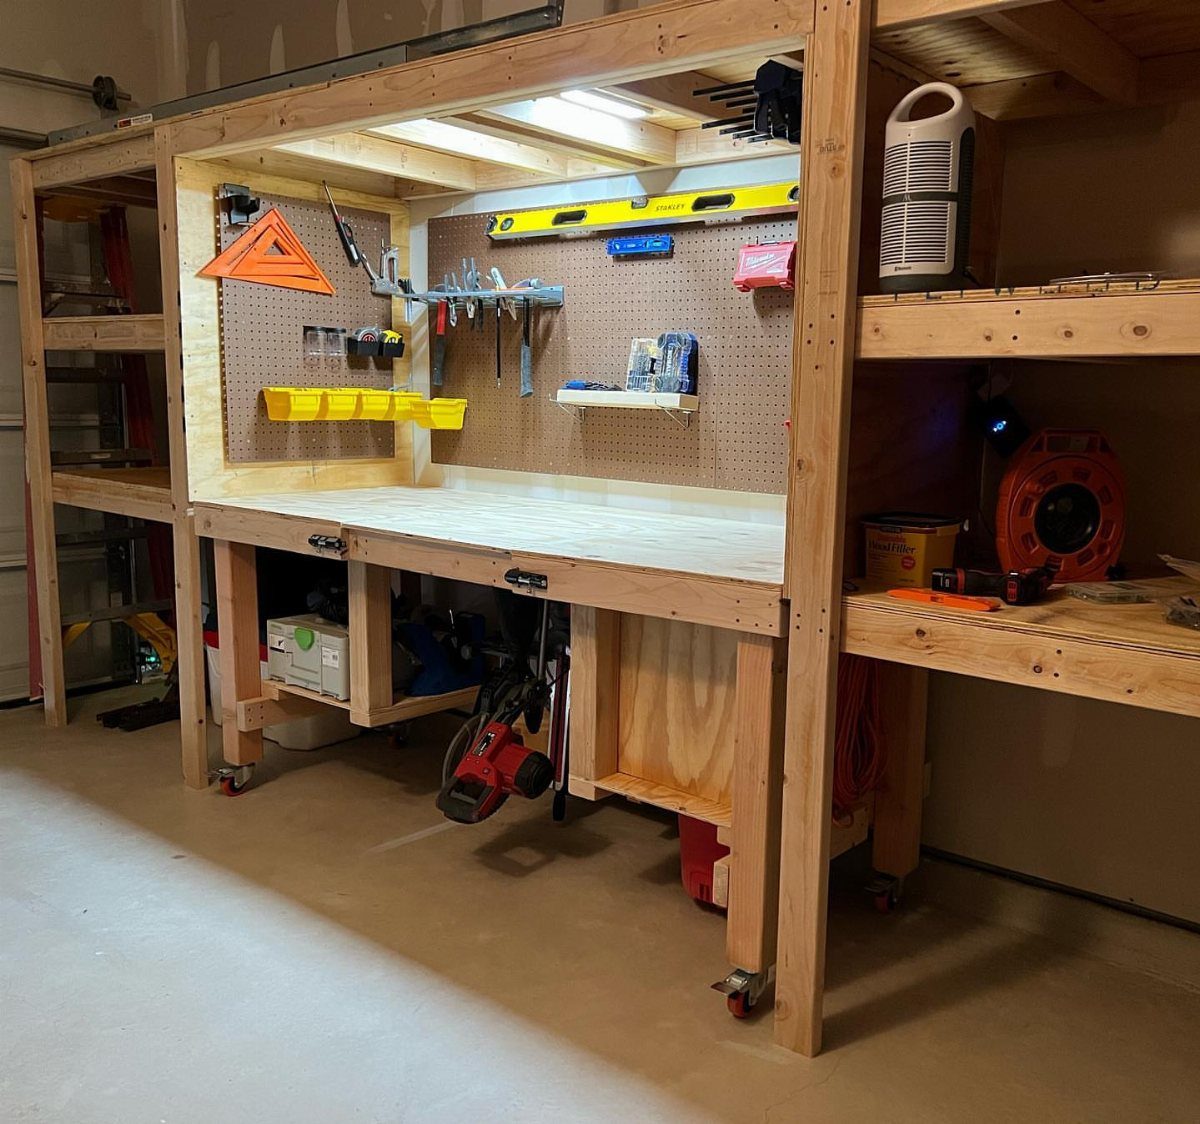
A bench on red casters carries its pegboard, its tools and its light with it, so the whole station rolls to the job instead of the job coming to the bench.
In a garage that also has to hold a car, that matters.
Keep the tools you grab most on the pegboard and the small stuff on the side shelf, such as the wood filler. Heavy items go low, near the wheels, so the bench stays steady when you push it.
Buy locking casters for every corner. Rolling a bench with a cord attached is a recipe for a yanked plug, so run the LED lighting off a cord long enough to follow it.
14. Tool Cabinets
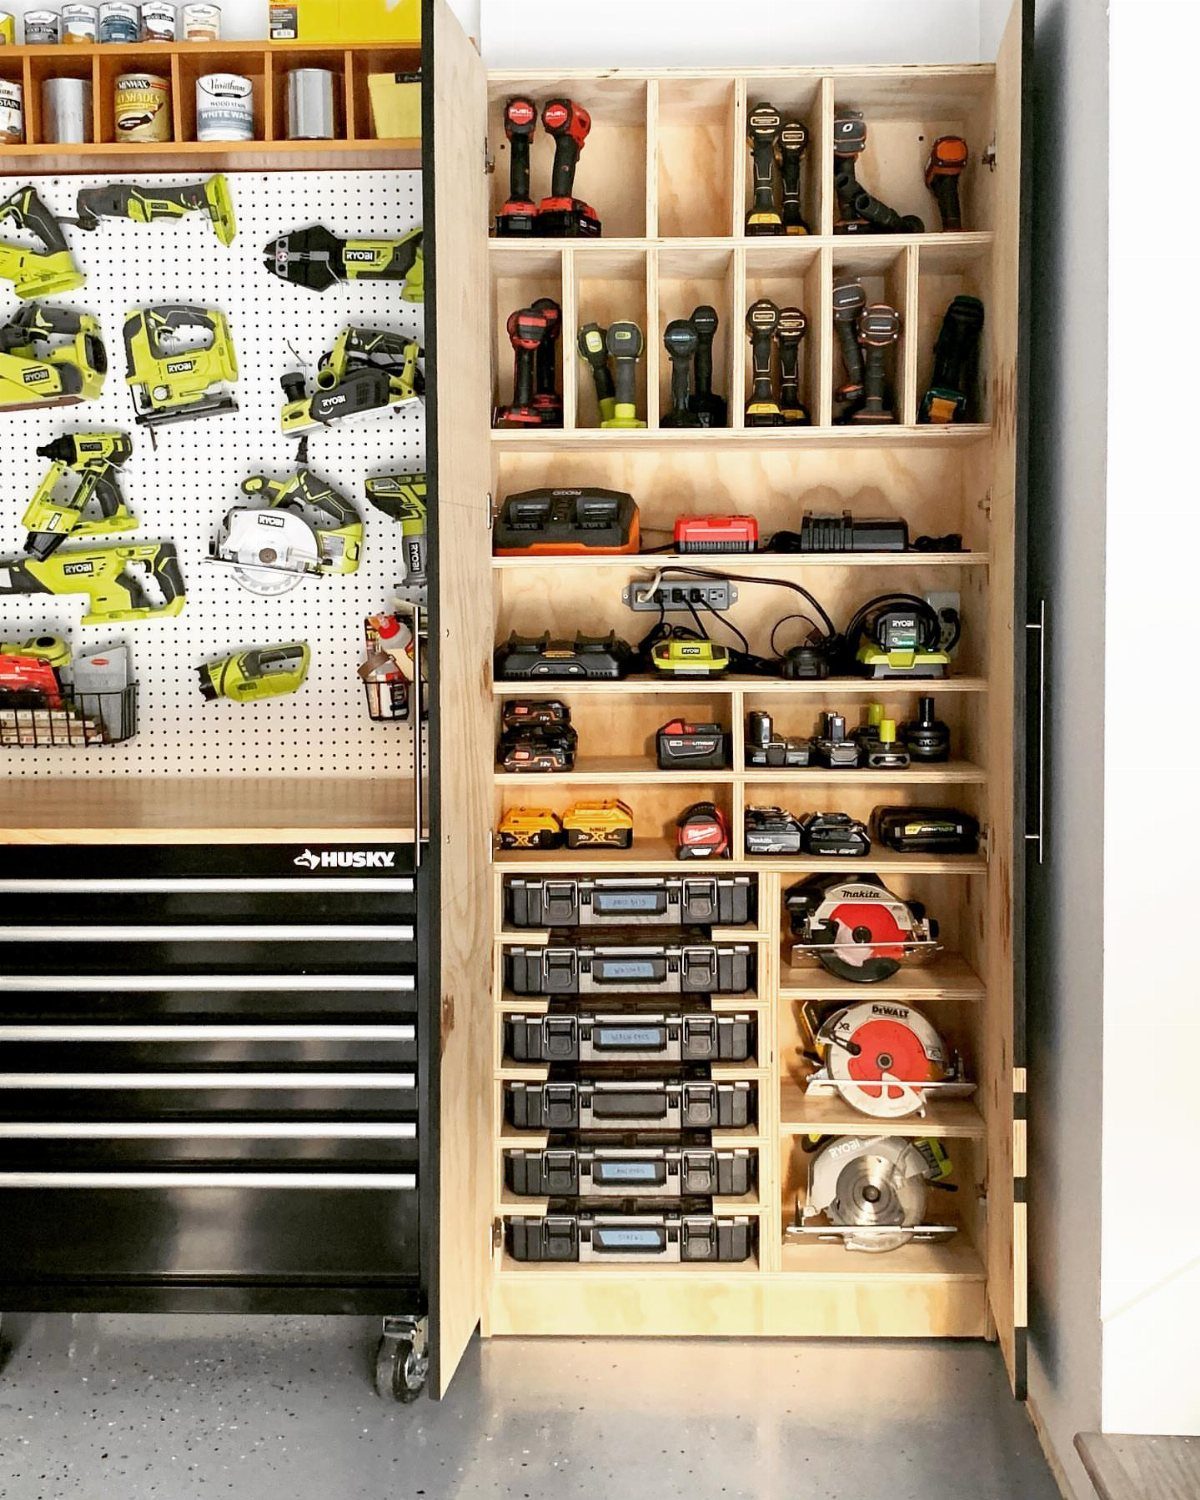
A shop-built wooden cabinet next to a rolling tool chest gives power tools two kinds of storage: closed and fixed on one side, mobile on the other.
Drills, batteries and organizers stay together and out of sight, which keeps the bench clear.
I like building the cabinet from plywood, sized to the tools you actually own.
Measure the biggest case first, then set the shelves around it. Batteries and small accessories do best in shallow organizers rather than loose on a shelf.
A black chest like the Husky one can hold the heavier tools low, where lifting them is easy. Add a latch or a lock to either piece if you want it secured.
15. Cordless Drill Charging Station
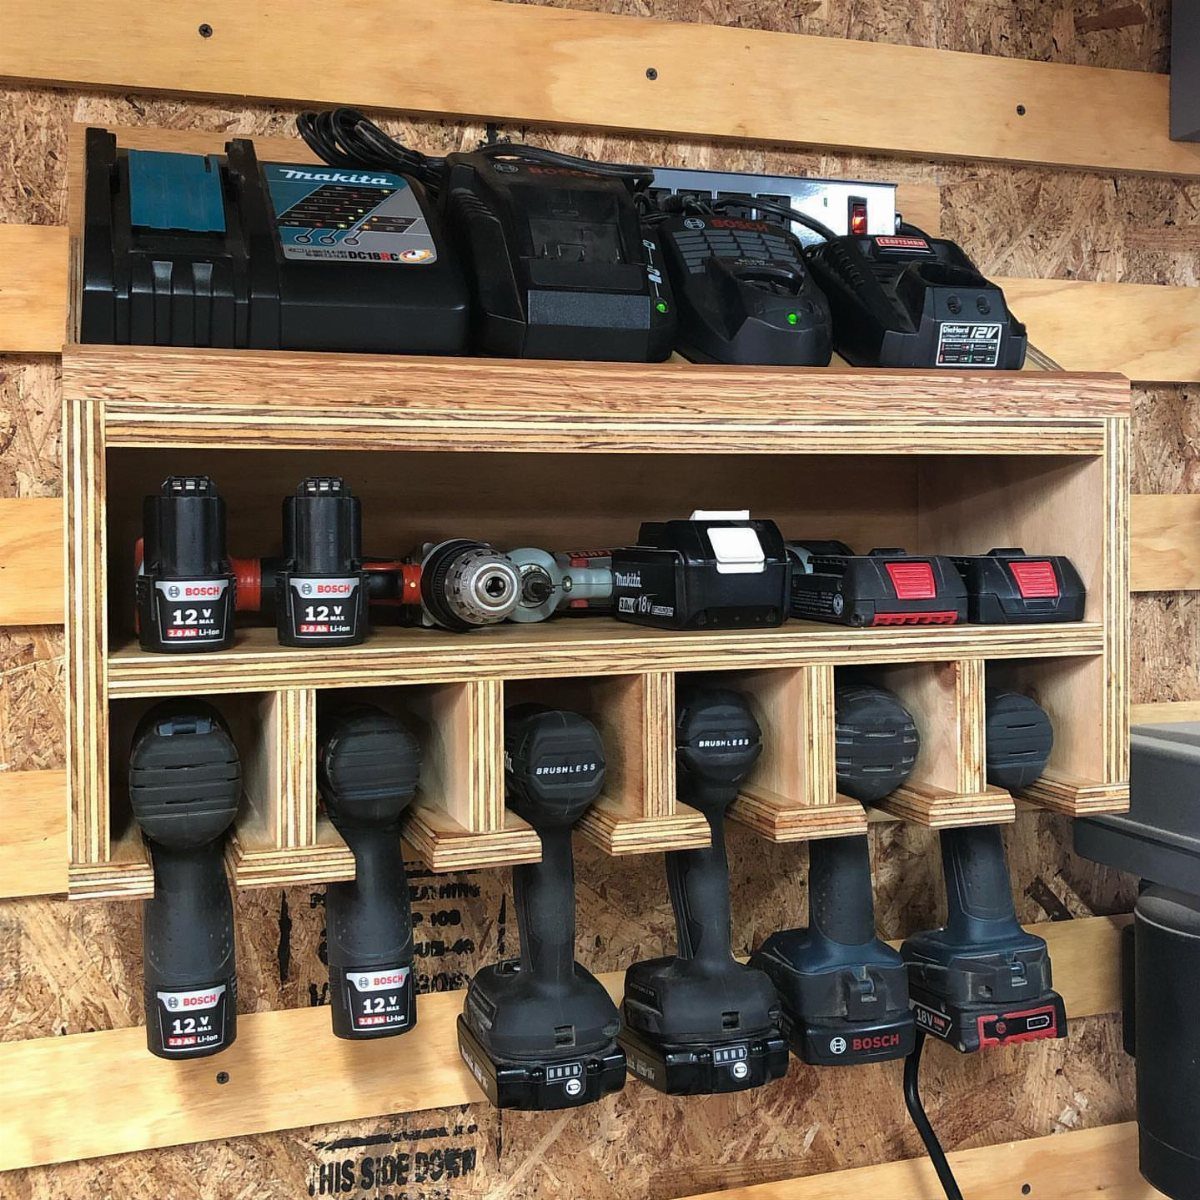
Cordless drills hang in custom slots on a wall organizer, with the chargers lined up on a shelf above. Every drill has a place, and every battery has a charger within reach.
Build it from plywood and cut each slot to fit the body of the drill, since a Makita and a Bosch won’t share the same opening.
Measure the tools before you cut anything. Put the chargers on the top shelf so cords drop straight down to an outlet instead of crossing the bench.
Mount the organizer into wall studs, because several drills plus batteries add real weight. Hang it near your work area so the drill you need is one step away.
16. Vertical Lumber Storage Rack
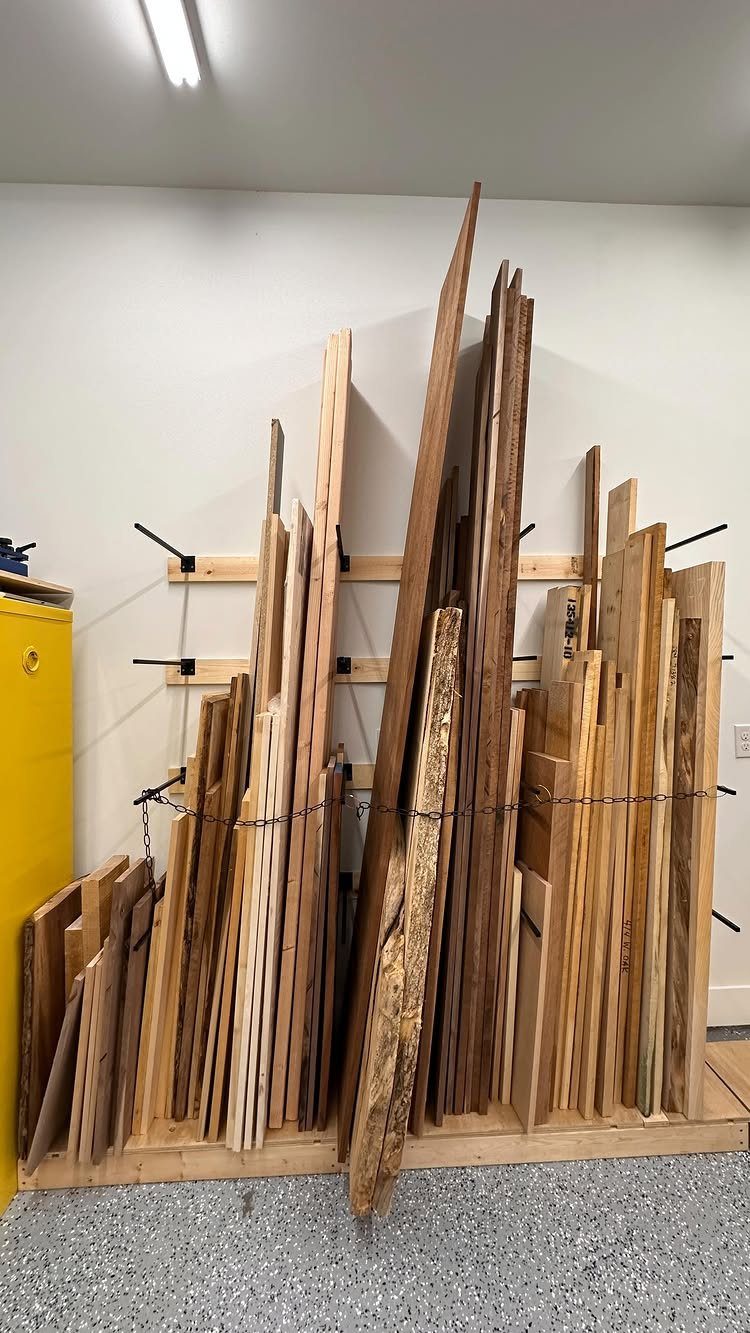
Boards stood on end along a wall take up a few inches of floor instead of a whole rack bay. Horizontal guide rails keep the stock upright, and a chain across the front holds everything in place.
Set the rails at different heights so short and long boards each get support.
Metal pins let you adjust where the stock rests. Fasten the rails into the wall studs, since a full load of lumber is heavy.
Sort boards by length, with the longest at one end, and you’ll see what’s left at a glance.
White walls behind the boards make the wood easy to pick out. Pull from the front and keep the chain closed afterward.
17. Sawhorse Storage Slot
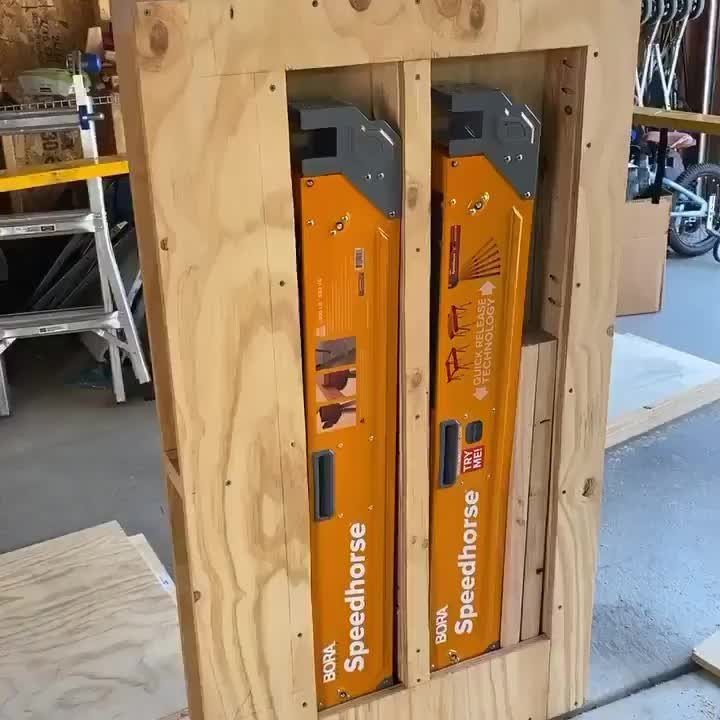
Folding sawhorses are great at work and awkward everywhere else. A plywood slot that holds a pair upright, like the two orange Bora Speedhorse units here, gets them off the floor and keeps them ready to grab.
Build the slot to the folded width of your sawhorses, with just enough clearance to slide them in and out.
A snug opening keeps them from tipping. Measure the folded thickness with both horses stacked, not one.
Place the slot near the door or the bench, wherever you set up most often. Plywood scraps and a few screws are enough, so it’s an easy afternoon build.
18. Wood-burning Workshop Stove
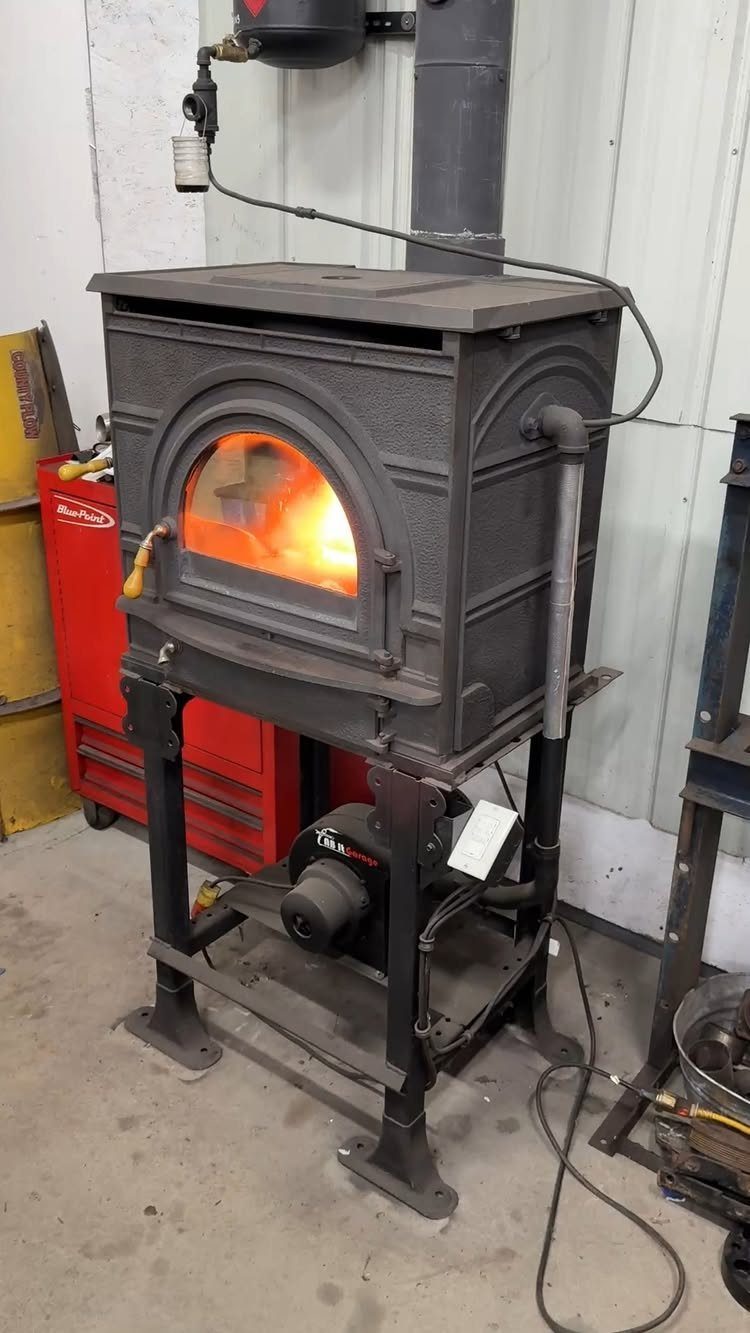
A cast-iron wood stove on a metal stand turns a cold garage into a place you can work in winter. The glowing fire is the draw, but the stand matters too: it keeps the stove off the floor.
Sawdust and finishes burn, so I’d keep the stove clear of the bench and the wood stack, and never burn scrap that has finish on it.
Installation is the part to get right. Check your local code for clearances and venting before you buy anything, and have the flue installed by a pro if you aren’t sure.
Expect to haul and store firewood, which takes room. If that’s too much in a small garage, this isn’t the best fit.
Space-saving Tips
Keep the center of the garage open. Long boards need room to move, and a bench parked in the middle blocks every long cut and every walk across the floor.
Push the bench against a wall and put storage along the sides. Clearing the middle of a small garage floor makes the whole room feel roughly twice its size, and you haven’t moved a single wall.
Single-car garages have the least free space, and a parked vehicle takes most of it. Anything that can roll should sit on a mobile base, so tools come out for a job and tuck back against the wall afterward.
Before you add anything new, ask whether it belongs on the wall or on wheels. If it needs a permanent spot in the middle, I’d leave it out.
Dust Management
For dust control, a basic shop vac at around $40–$50 is the first thing I’d buy, since it does more for the money than anything else. Run it after every work session, not just when the floor looks bad.
If you can, add a dust collector and match a vac to each tool that throws the most chips.
Put a dust mask on before every cut, sanding session included.
Open the garage door while you work. Moving air thins the dust cloud and pulls fumes from stains and finishes out with it.
Electrical Considerations
Count your outlets before you buy tools. A standard outlet and a properly rated extension cord will run a drill and a circular saw, so that’s all the power you need to get going.
Larger tools change that.
Check what each one draws, and don’t run several at once on the same circuit. Older garages are the most likely to need extra outlets or an upgraded electrical system.
Adding outlets or changing the panel is licensed-electrician work in most places, so I’d hire it out. Plan the outlet spots along the walls where your bench and tools will sit, so cords don’t cross the open floor.
Frequently Asked Questions
What is a woodworking garage?
A woodworking garage is a regular garage that you use for building wood projects, such as shelves, boxes or a bench.
A one-car or two-car garage has plenty of room to start a woodshop, and a separate building or a pro-level setup isn’t required.
How can I maximize space in my garage workshop?
Layout matters most here: leave the middle of the floor clear, set the workbench against a wall, and line the sides with shelves and cabinets.
My own rule for any new tool or cabinet is a quick question: can it hang on a wall or ride on wheels? If it needs a fixed spot in the middle of the floor, it stays out.






